- Set up billing for your account: Complete the billing setup process for Developer and Plus plans, including special instructions for legacy accounts.
- Update your information: Modify invoice email addresses, business information, and tax IDs for your organization.
- Optimize your tracing spend: Learn how to reduce costs through data retention management and usage limits.
Set up billing for your account
Before using this guide, note the following:
- If you are interested in the Enterprise plan, please contact sales. This guide is only for our self-serve billing plans.
- If you created your LangSmith organization before pricing was introduced on April 2nd, 2024, please skip to the final section.
Developer Plan: set up billing on your personal organization
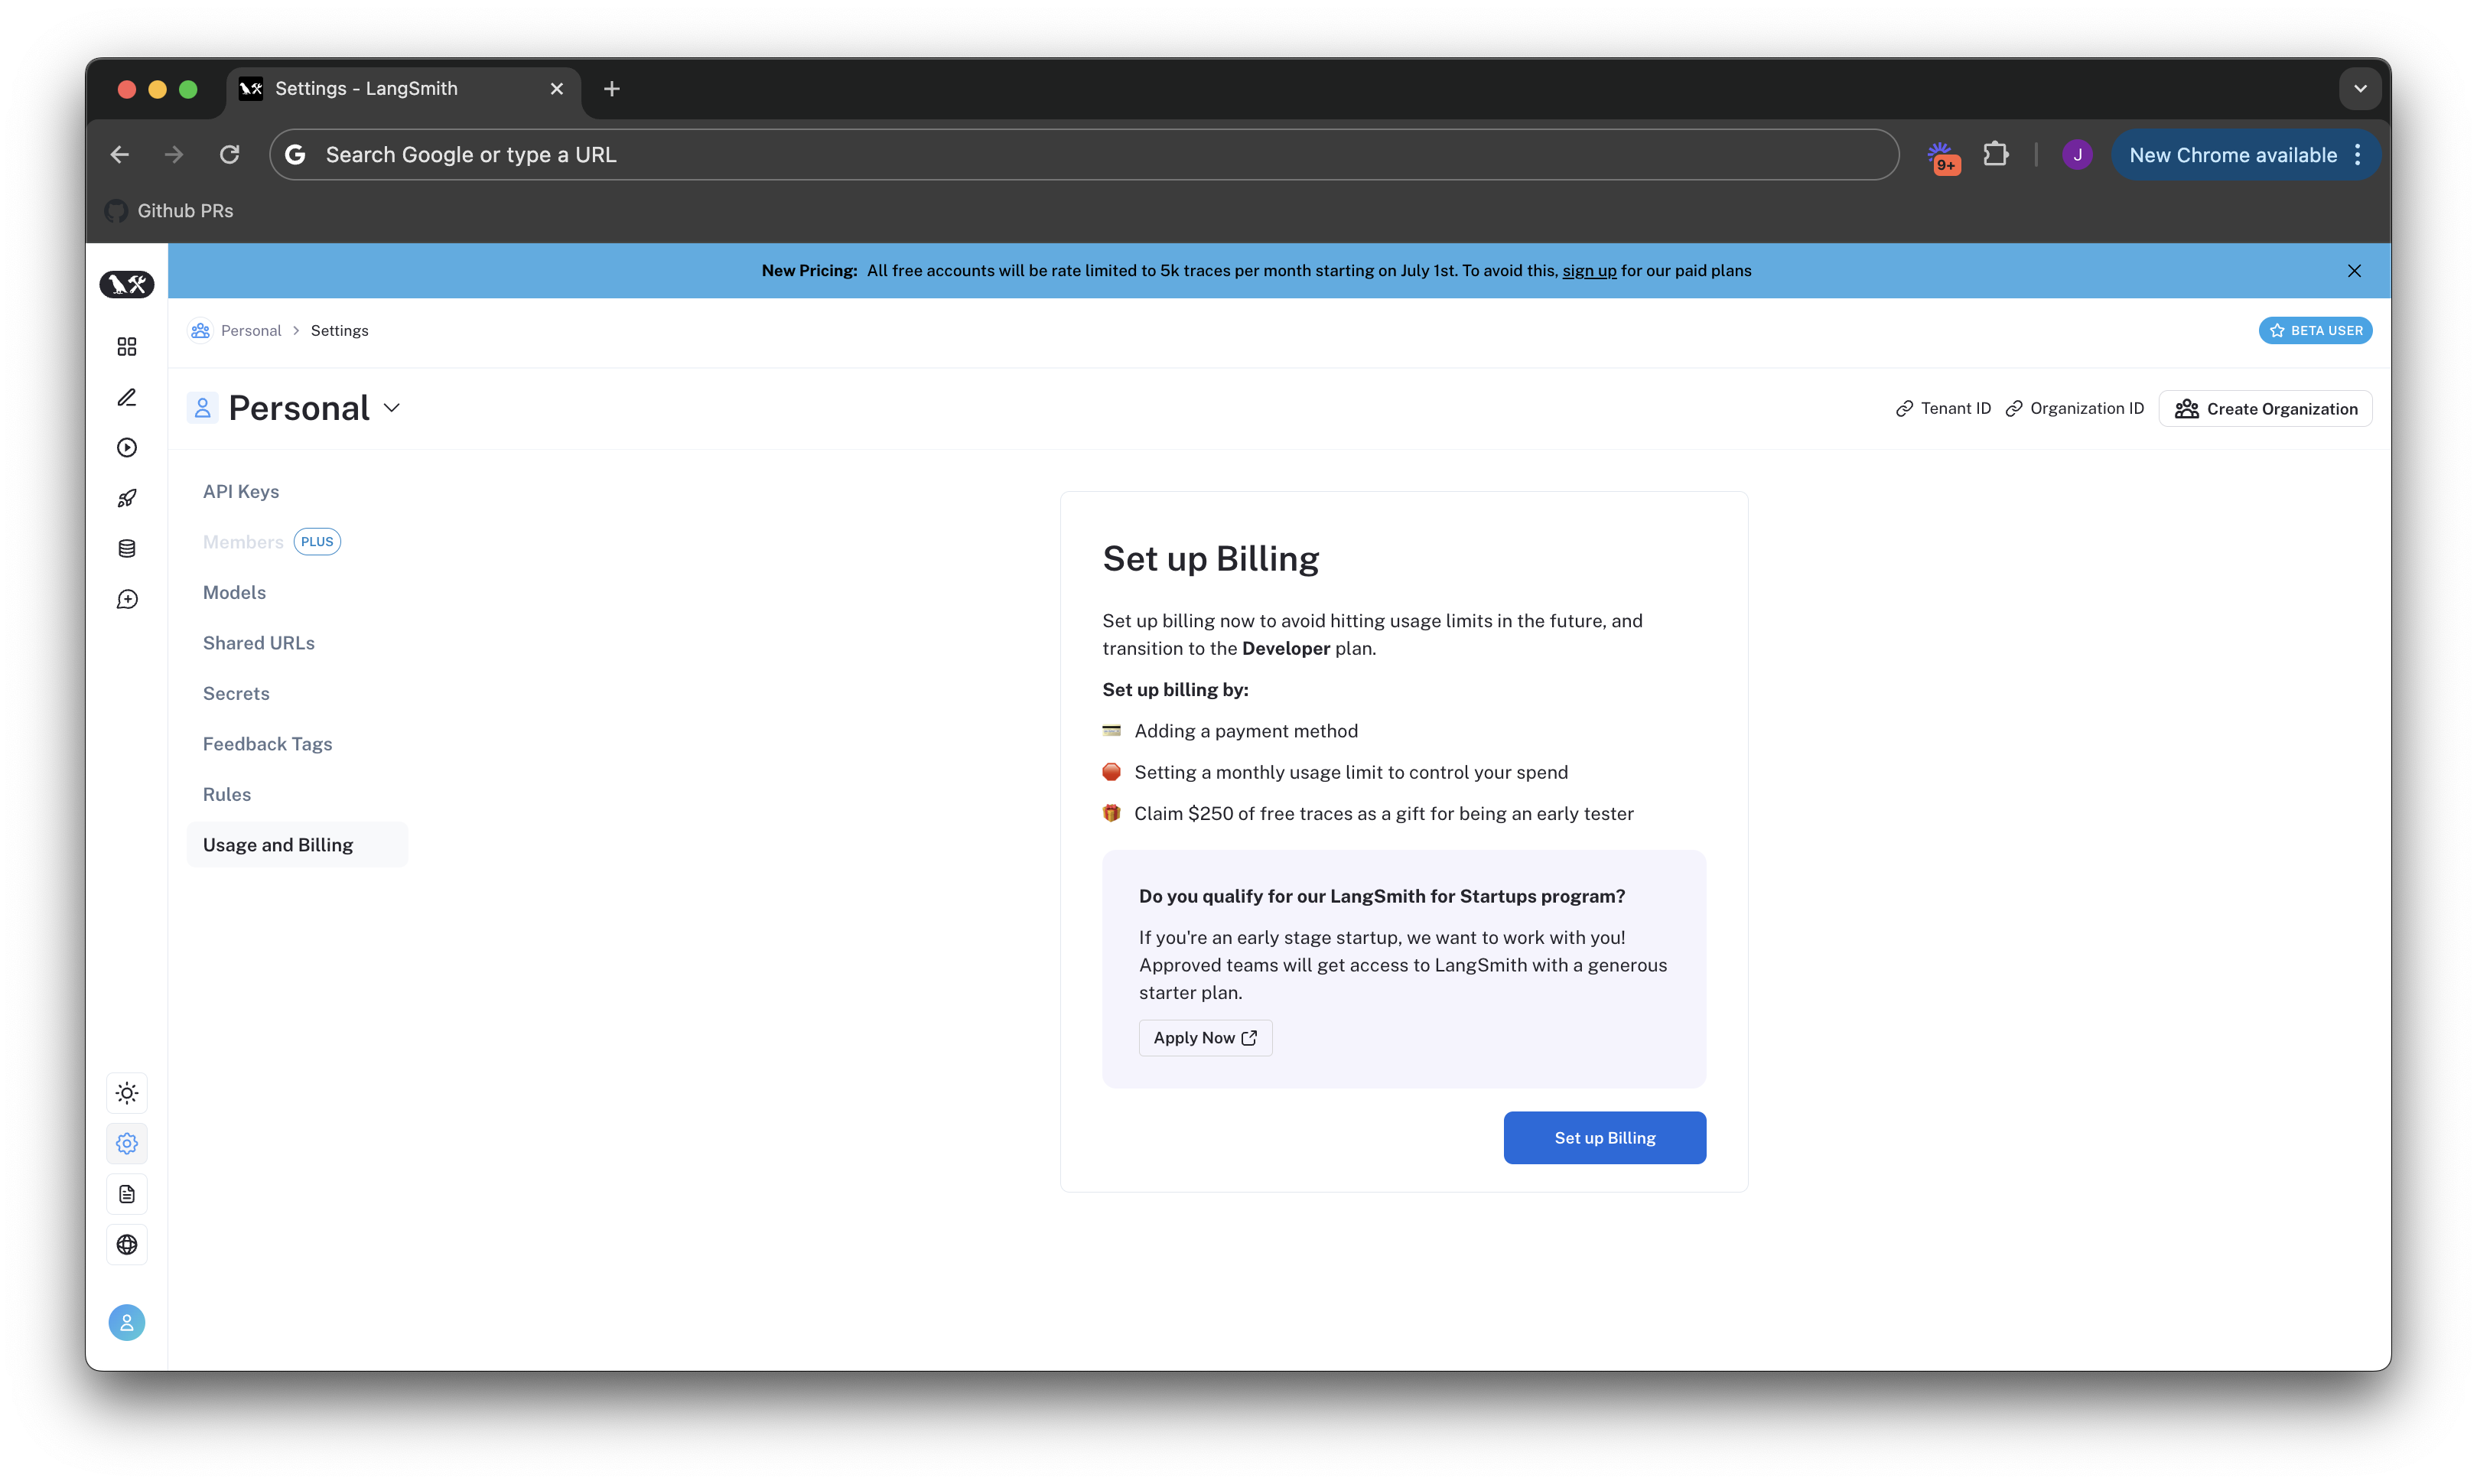
Personal organizations are limited to 5000 traces per month until a credit card is added. You can add a credit card on the Plans and Billing page as follows:- Click Set up Billing

- Add your credit card information. After this step, you will no longer be rate limited to 5000 traces, and you will be charged for any excess traces at rates specified on the pricing page.
Plus Plan: set up billing on a shared organization
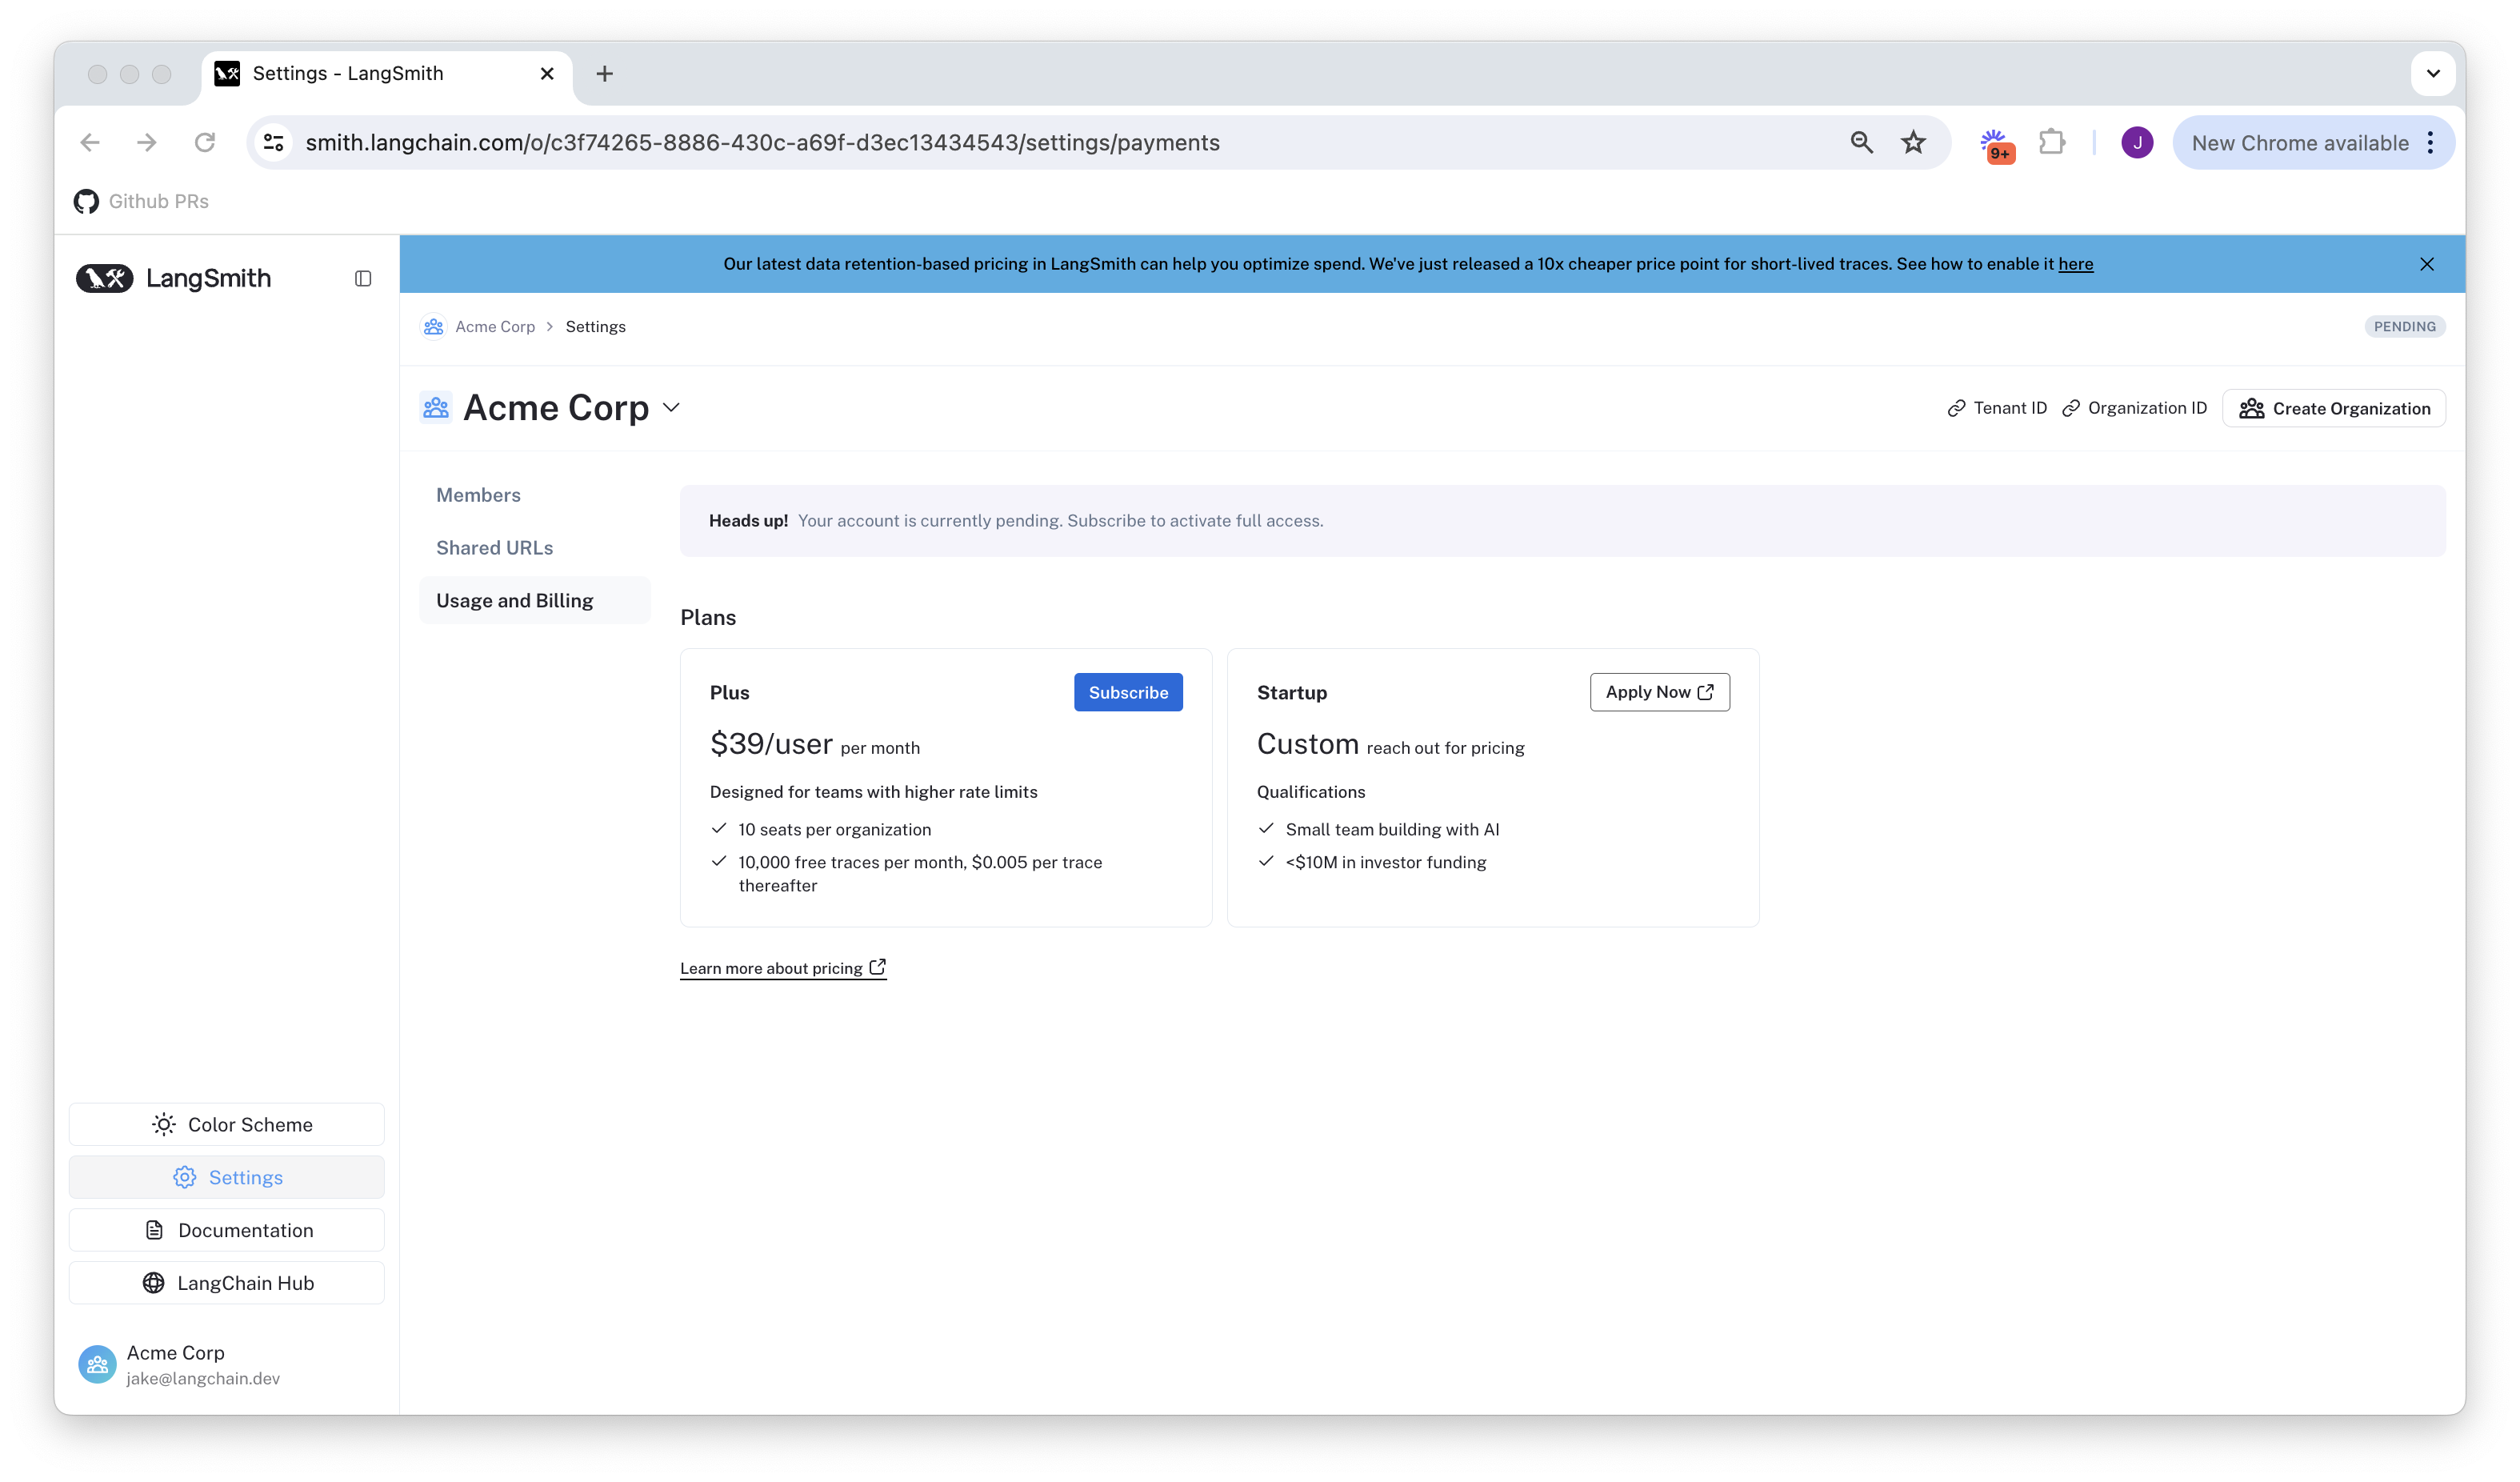
If you have not yet created an organization, you need to follow this guide before setting up billing. The following steps assume you are already in a new organization.You can’t use a new organization until you enter credit card information. After you complete the following steps, you will gain complete access to LangSmith.
-
Click Subscribe on the Plus page.
If you are a startup building with AI, instead click Apply Now on the Startup Plan. You may be eligible for discounted prices and a free, monthly trace allotment.
- Review your existing members. Before subscribing, LangSmith lets you remove any added users that you do not want to be included in the bill.
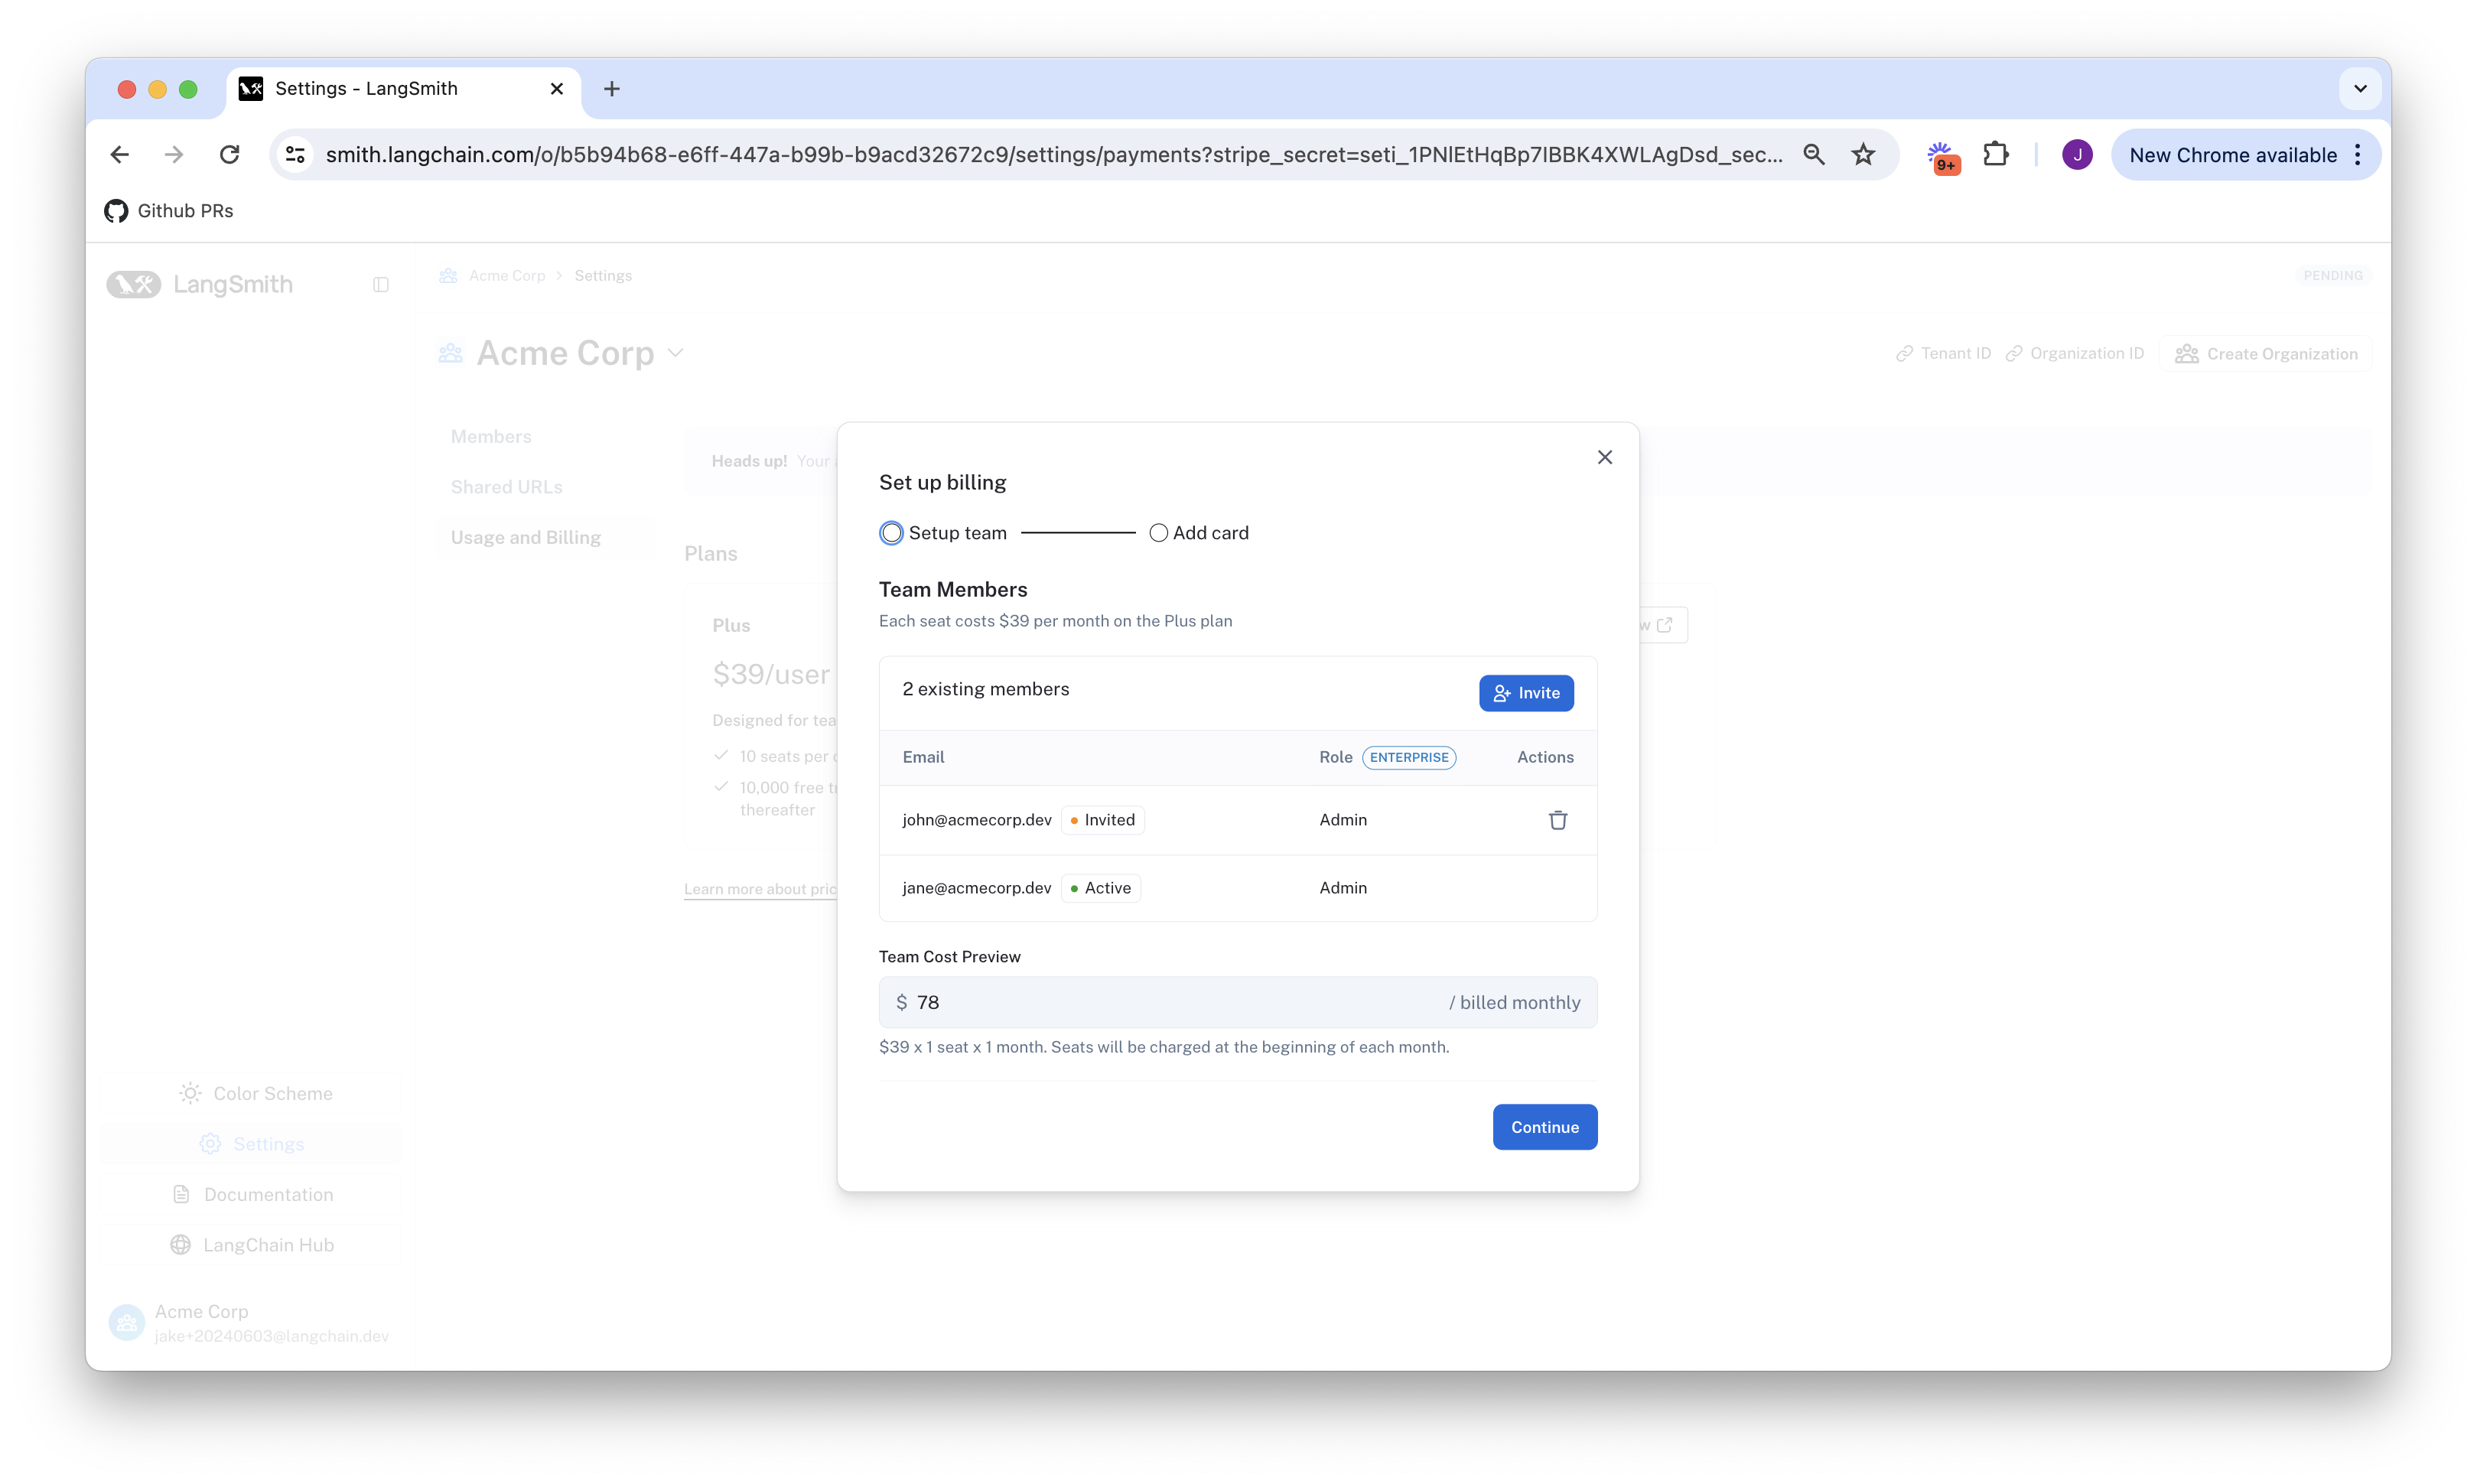
- Enter your credit card information. Then, enter business information, invoice email, and tax ID. If this organization belongs to a business, check the This is a business checkbox and enter the information accordingly.
Set up billing for accounts created before pricing introduction
If you joined LangSmith before pricing was introduced on April 2, 2024, you have the option to upgrade your existing account to set up billing. If you did not set up billing by July 8, 2024, then your account is now rate limited to a maximum of 5,000 traces per month.- Navigate to the Settings page.
- Click Set up Billing.
- Enter your credit card information. If you are on a Personal organization, this will add you to the Developer plan. If you are on a shared organization, this will add you to the Plus plan. For more information, refer to the guides for the Developer or Plus plans respectively, starting at step 2.
- Claim free credits as a thank you for being an early LangSmith user.
Update your information
To update business information for your LangSmith organization, head to the Usage and Billing page under Settings and click on the Plans and Billing tab.Business information, tax ID, and invoice email can only be updated for the Plus and Startup plans. Free and Developer plans cannot update this information.
Invoice email
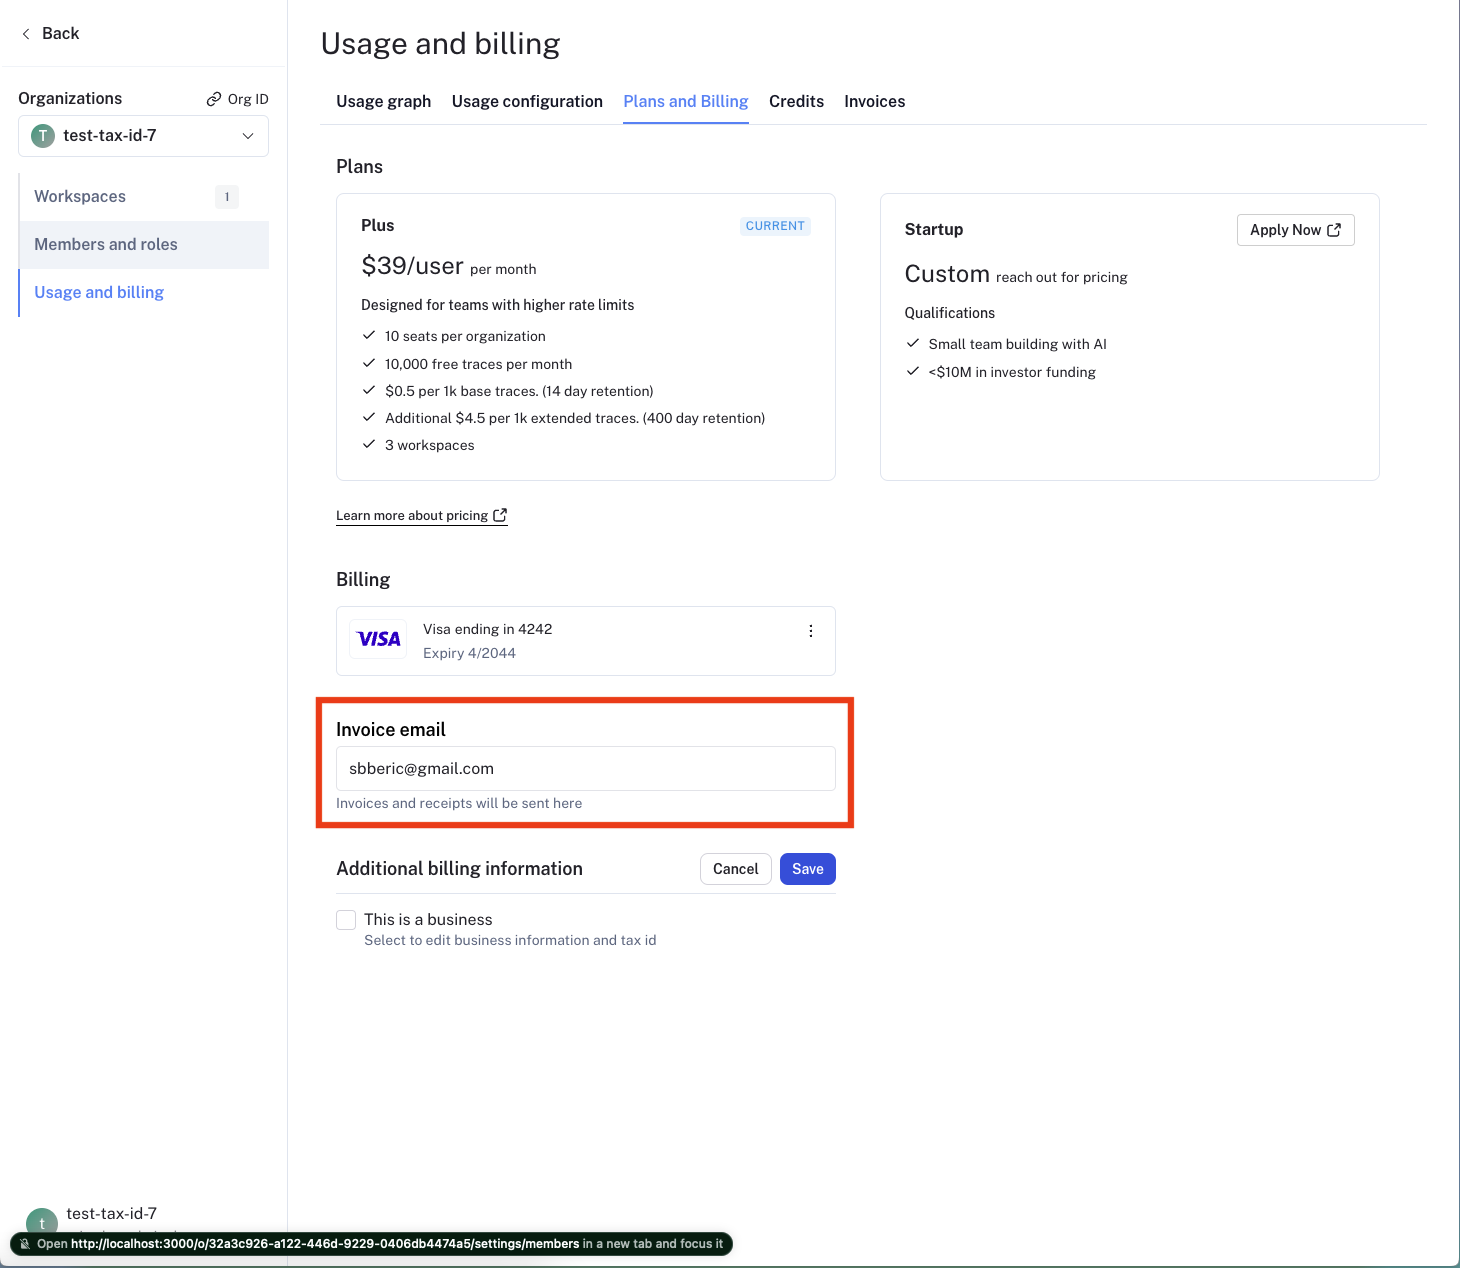
- Navigate to the Plans and Billing tab.
- Locate the section beneath the payment method, where the current invoice email is displayed.
- Enter the new email address for invoices in the provided field.
- The new email address will be automatically saved.
Business information and tax ID
In certain jurisdictions, LangSmith is required to collect sales tax. If you are a business, providing your tax ID may qualify you for a sales tax exemption.
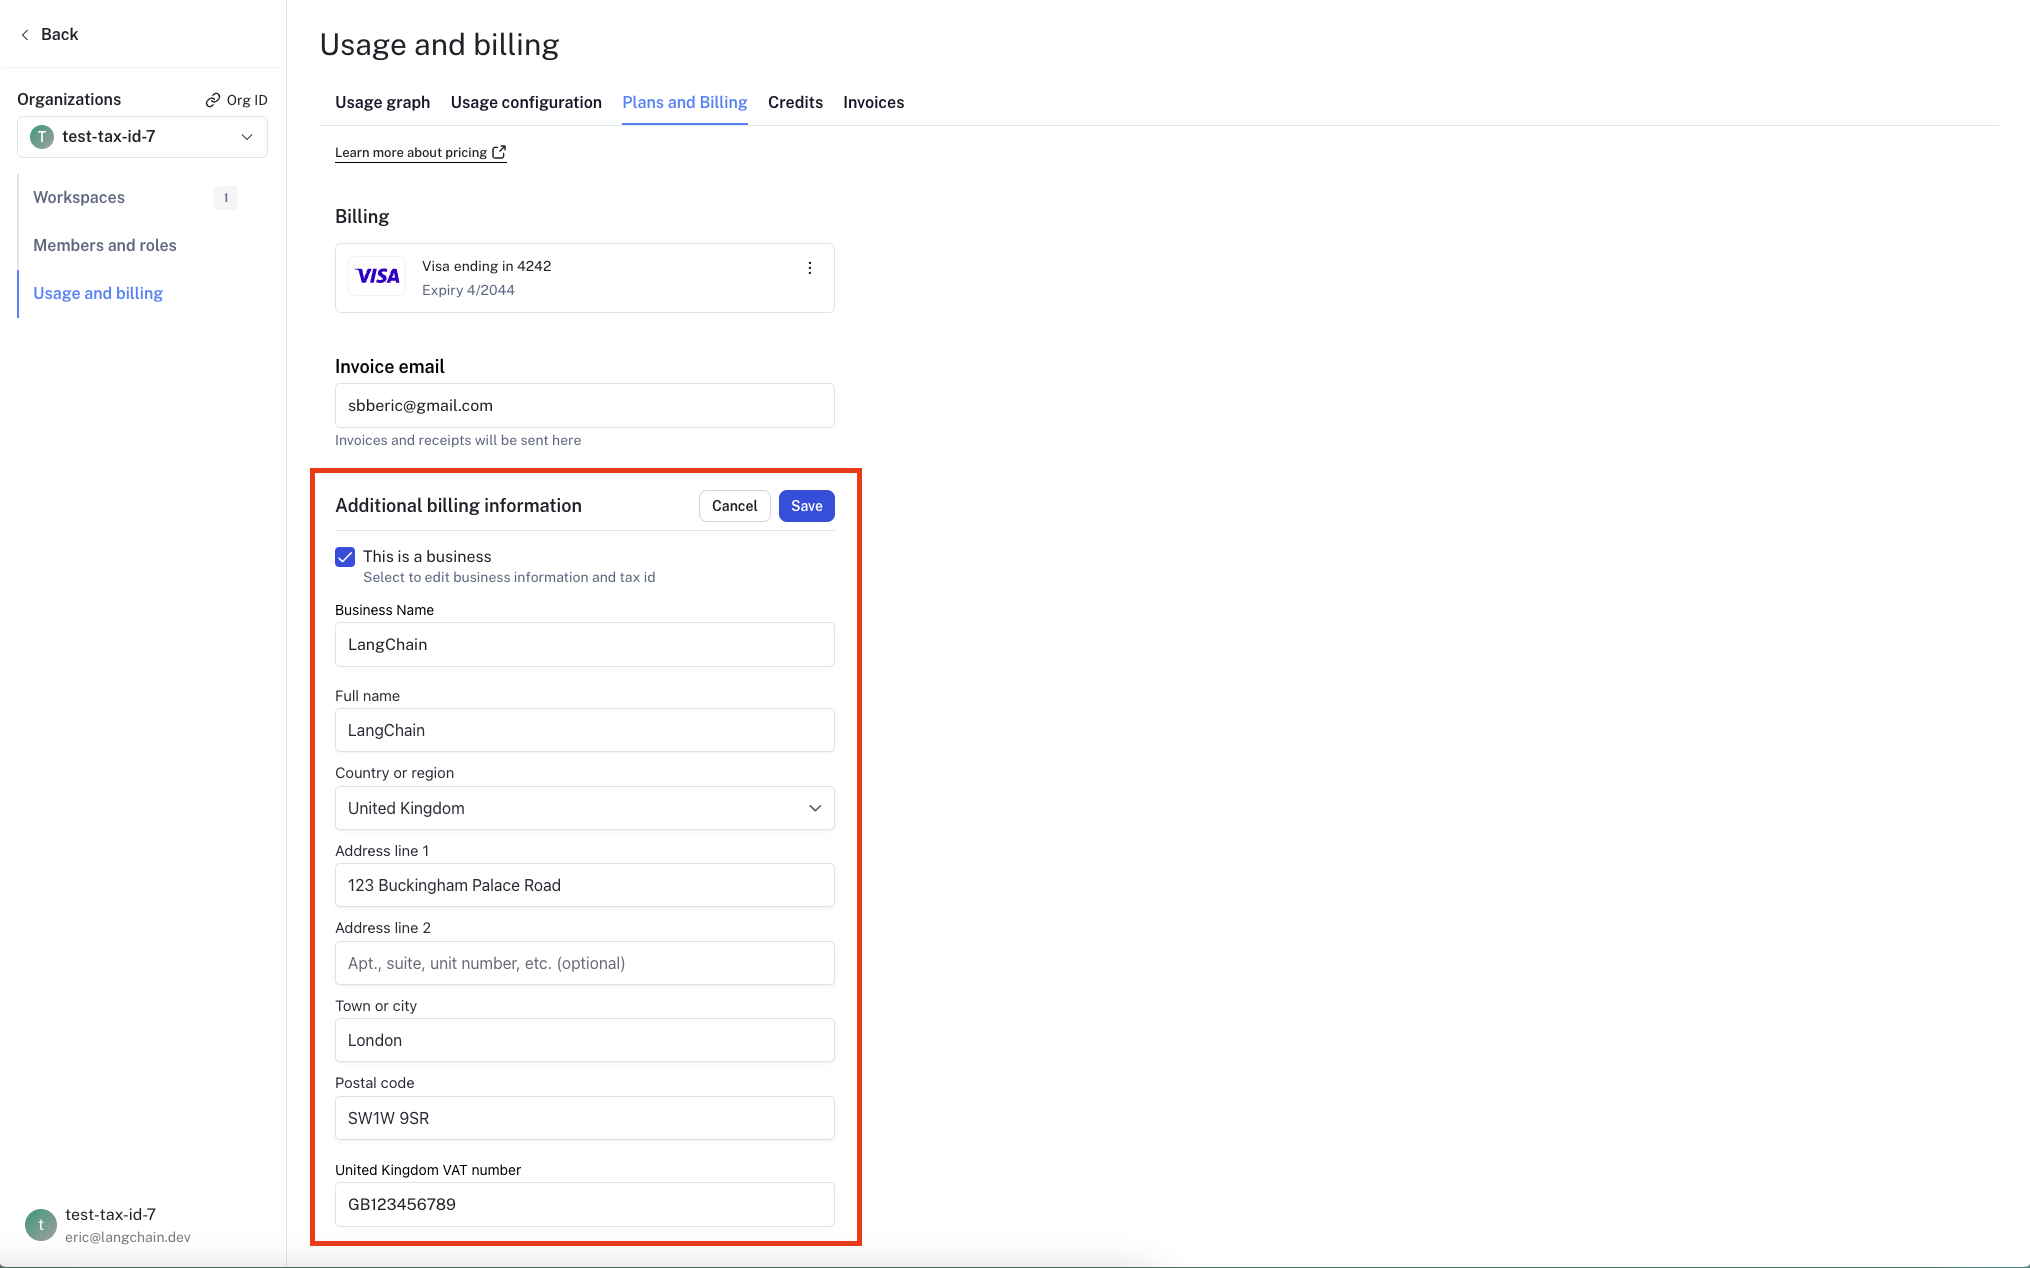
- Navigate to the Plans and Billing tab.
- Below the invoice email section, you will find a checkbox labeled Business.
- Check the Business checkbox if your organization belongs to a business.
- A business information section will appear, allowing you to enter or update the following details:
- Business Name
- Address
- Tax ID for applicable jurisdictions
- A Tax ID field will appear for applicable jurisdictions after you select a country.
- After entering the necessary information, click the Save button to save your changes.
Optimize your tracing spend
You may find it helpful to read the following pages, before continuing with this section on optimizing your tracing spend:
Some of the features mentioned in this guide are not currently available on Enterprise plan due to its custom nature of billing. If you are on the Enterprise plan and have questions about cost optimization, reach out to your sales rep or support@langchain.dev.
- Reducing existing costs with data retention policies.
- Preventing future overspend with usage limits.
Dev, Staging, and Prod):

Understand your current usage
The first step of any optimization process is to understand current usage. LangSmith provides two ways to do this: Usage graph and Invoices.Usage graph
The usage graph lets you examine how much of each usage-based pricing metric you have consumed. It does not directly show spend (which you will review later in the draft invoice). You can navigate to the usage graph under Settings -> Usage and Billing -> Usage Graph.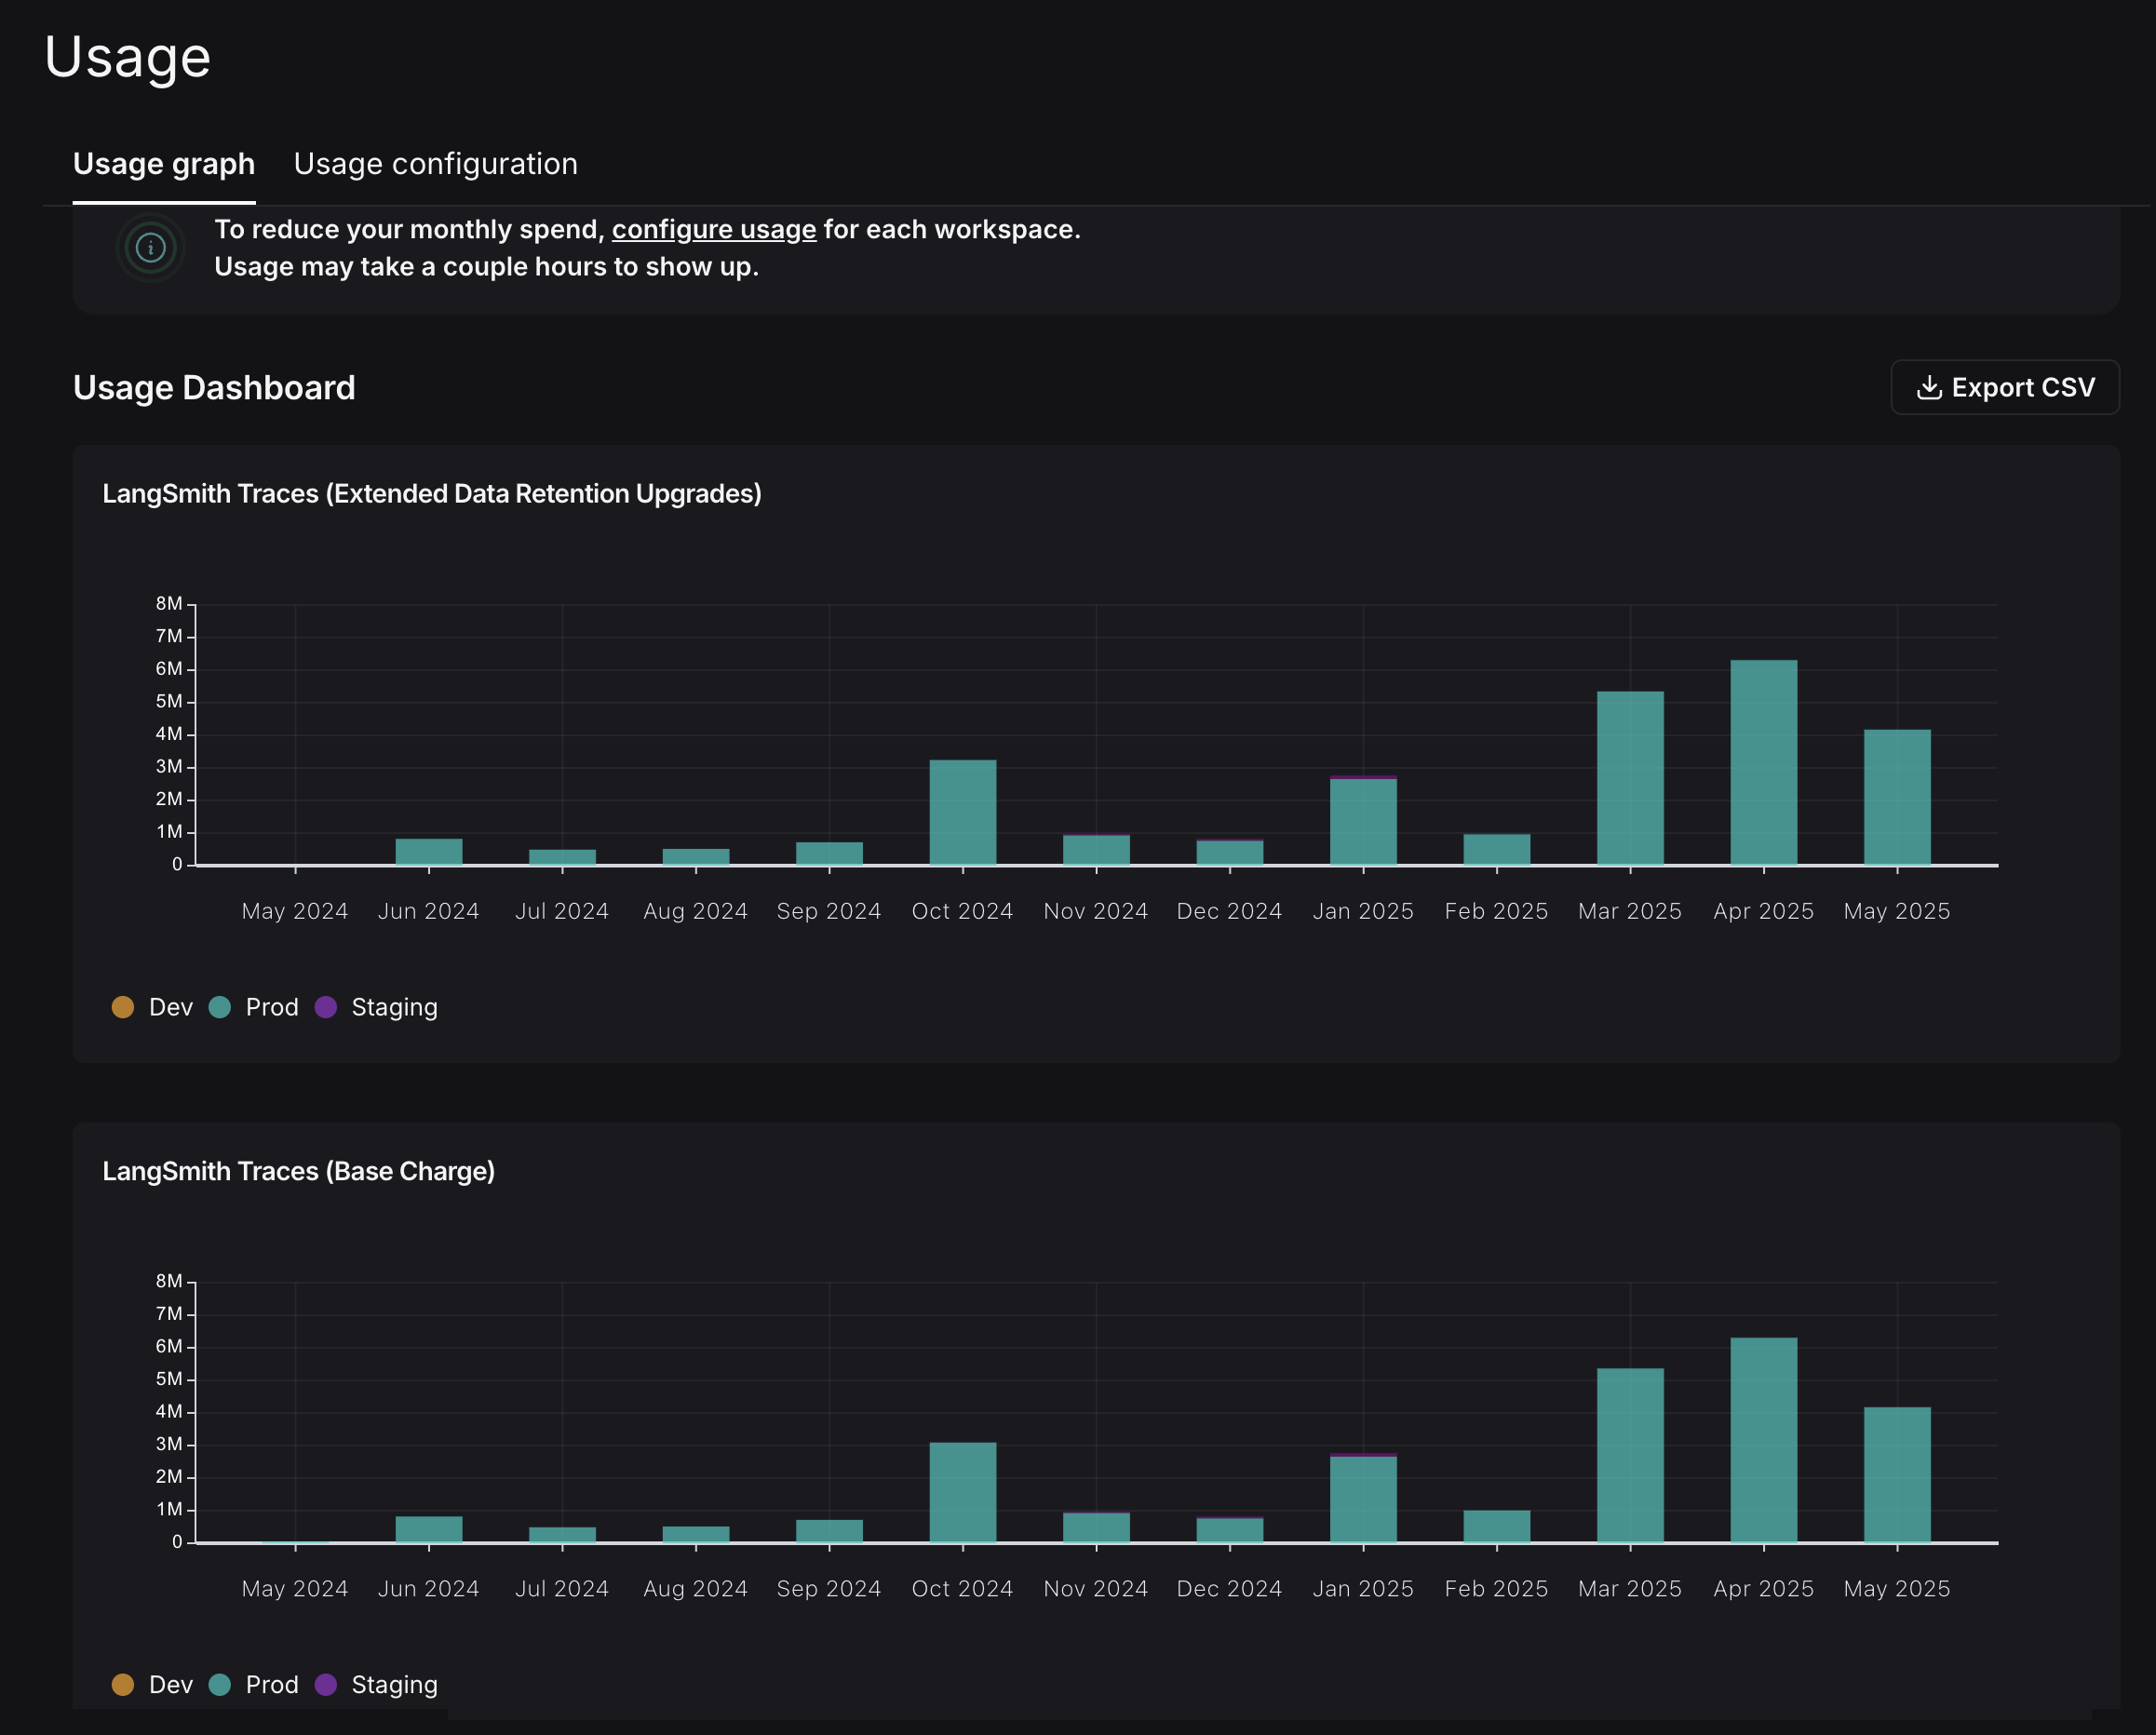
- LangSmith Traces (Base Charge): tracks all traces that you send to LangSmith.
- LangSmith Traces (Extended Data Retention Upgrades): tracks all traces that also have our Extended 400 Day Data Retention.
Invoices
You understand what usage looks like in terms of traces, but you now need to translate that into spend. To do so, navigate to the Invoices tab. The first invoice that will appear on screen is a draft of your current month’s invoice, which shows your running spend thus far this month.
LangSmith’s Usage Graph and Invoice use the term
tenant_id to refer to a workspace ID. They are interchangeable.- You use extended data retention tracing, which means by default your traces are retained for 400 days.
- You use base data retention tracing and use a feature that automatically extends the data retention of a trace. (Refer to the Auto-Upgrade conceptual docs.)
Optimization 1: manage data retention
LangSmith charges differently based on a trace’s data retention, where short-lived traces are an order of magnitude less expensive than ones that last for a long time. In this optimization, you’ll learn how to get optimal settings for data retention without sacrificing historical observability, and see the effect it has on the bill.Change org level retention defaults for new projects
Navigate to the Usage configuration tab, and look at the organization level retention settings. Modifying this setting affects all new projects that are created going forward in all workspaces in the organizaton.For backwards compatibility, older organizations may have this defaulted to Extended. Organizations created after June 3rd, 2024 have this defaulted to Base.

Change project level retention defaults
Data retention settings are adjustable per project on the tracing project page. Navigate to Projects > Your project name > Select Retention and modify the default retention of the project to Base. This will only affect retention (and pricing) for traces going forward.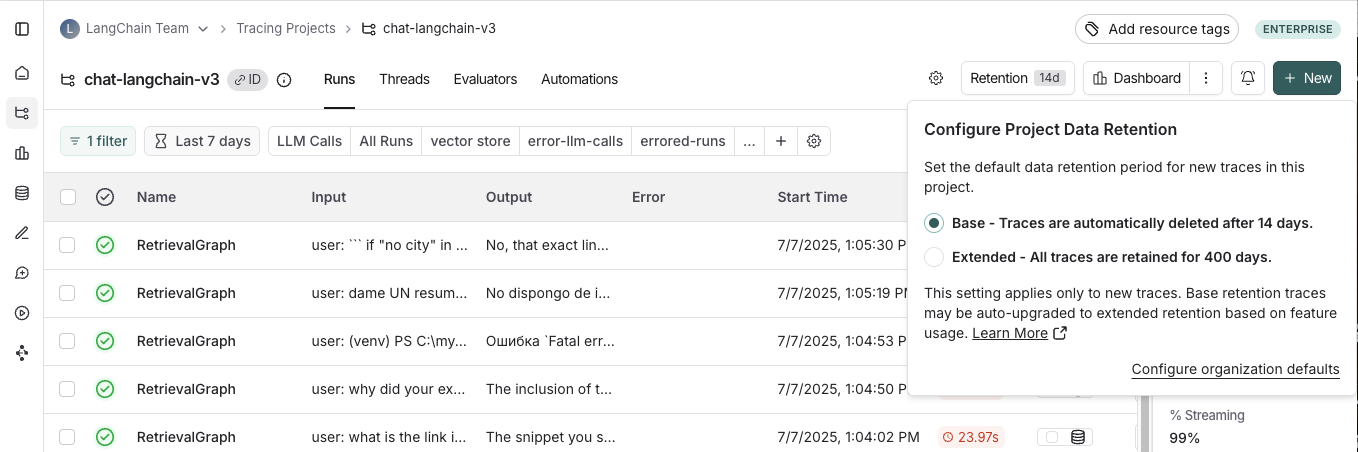
Apply extended data retention to a percentage of traces
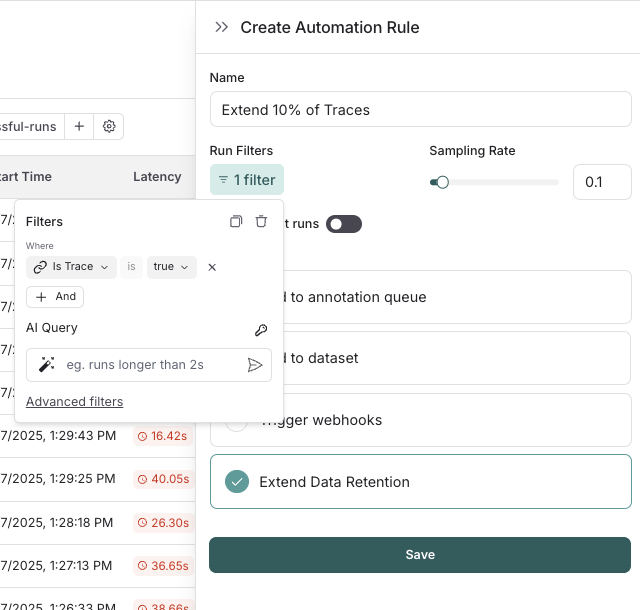
You may not want all traces to expire after 14 days. You can automatically extend the retention of traces that match some criteria by creating an automation rule. You might want to apply extended data retention to specific types of traces, such as:- 10% of all traces: For general analysis or analyzing trends long term.
- Errored traces: To investigate and debug issues thoroughly.
- Traces with specific metadata: For long-term examination of particular features or user flows.
- Navigate to Projects > Your project name > Select + New > Select New Automation.
- Name your rule and optionally apply filters or a sample rate. For more information on configuring filters, refer to filtering techniques.
For example, this is the expected configuration to keep 10% of all traces for extended data retention:
See results after 7 days
While the total amount of traces per day stayed the same, the extended data retention traces was cut heavily. In the invoice, the spend reduced to roughly $900 in the last 7 days, as opposed to $2,000 in the previous 4. That’s a cost reduction of nearly 75% per day.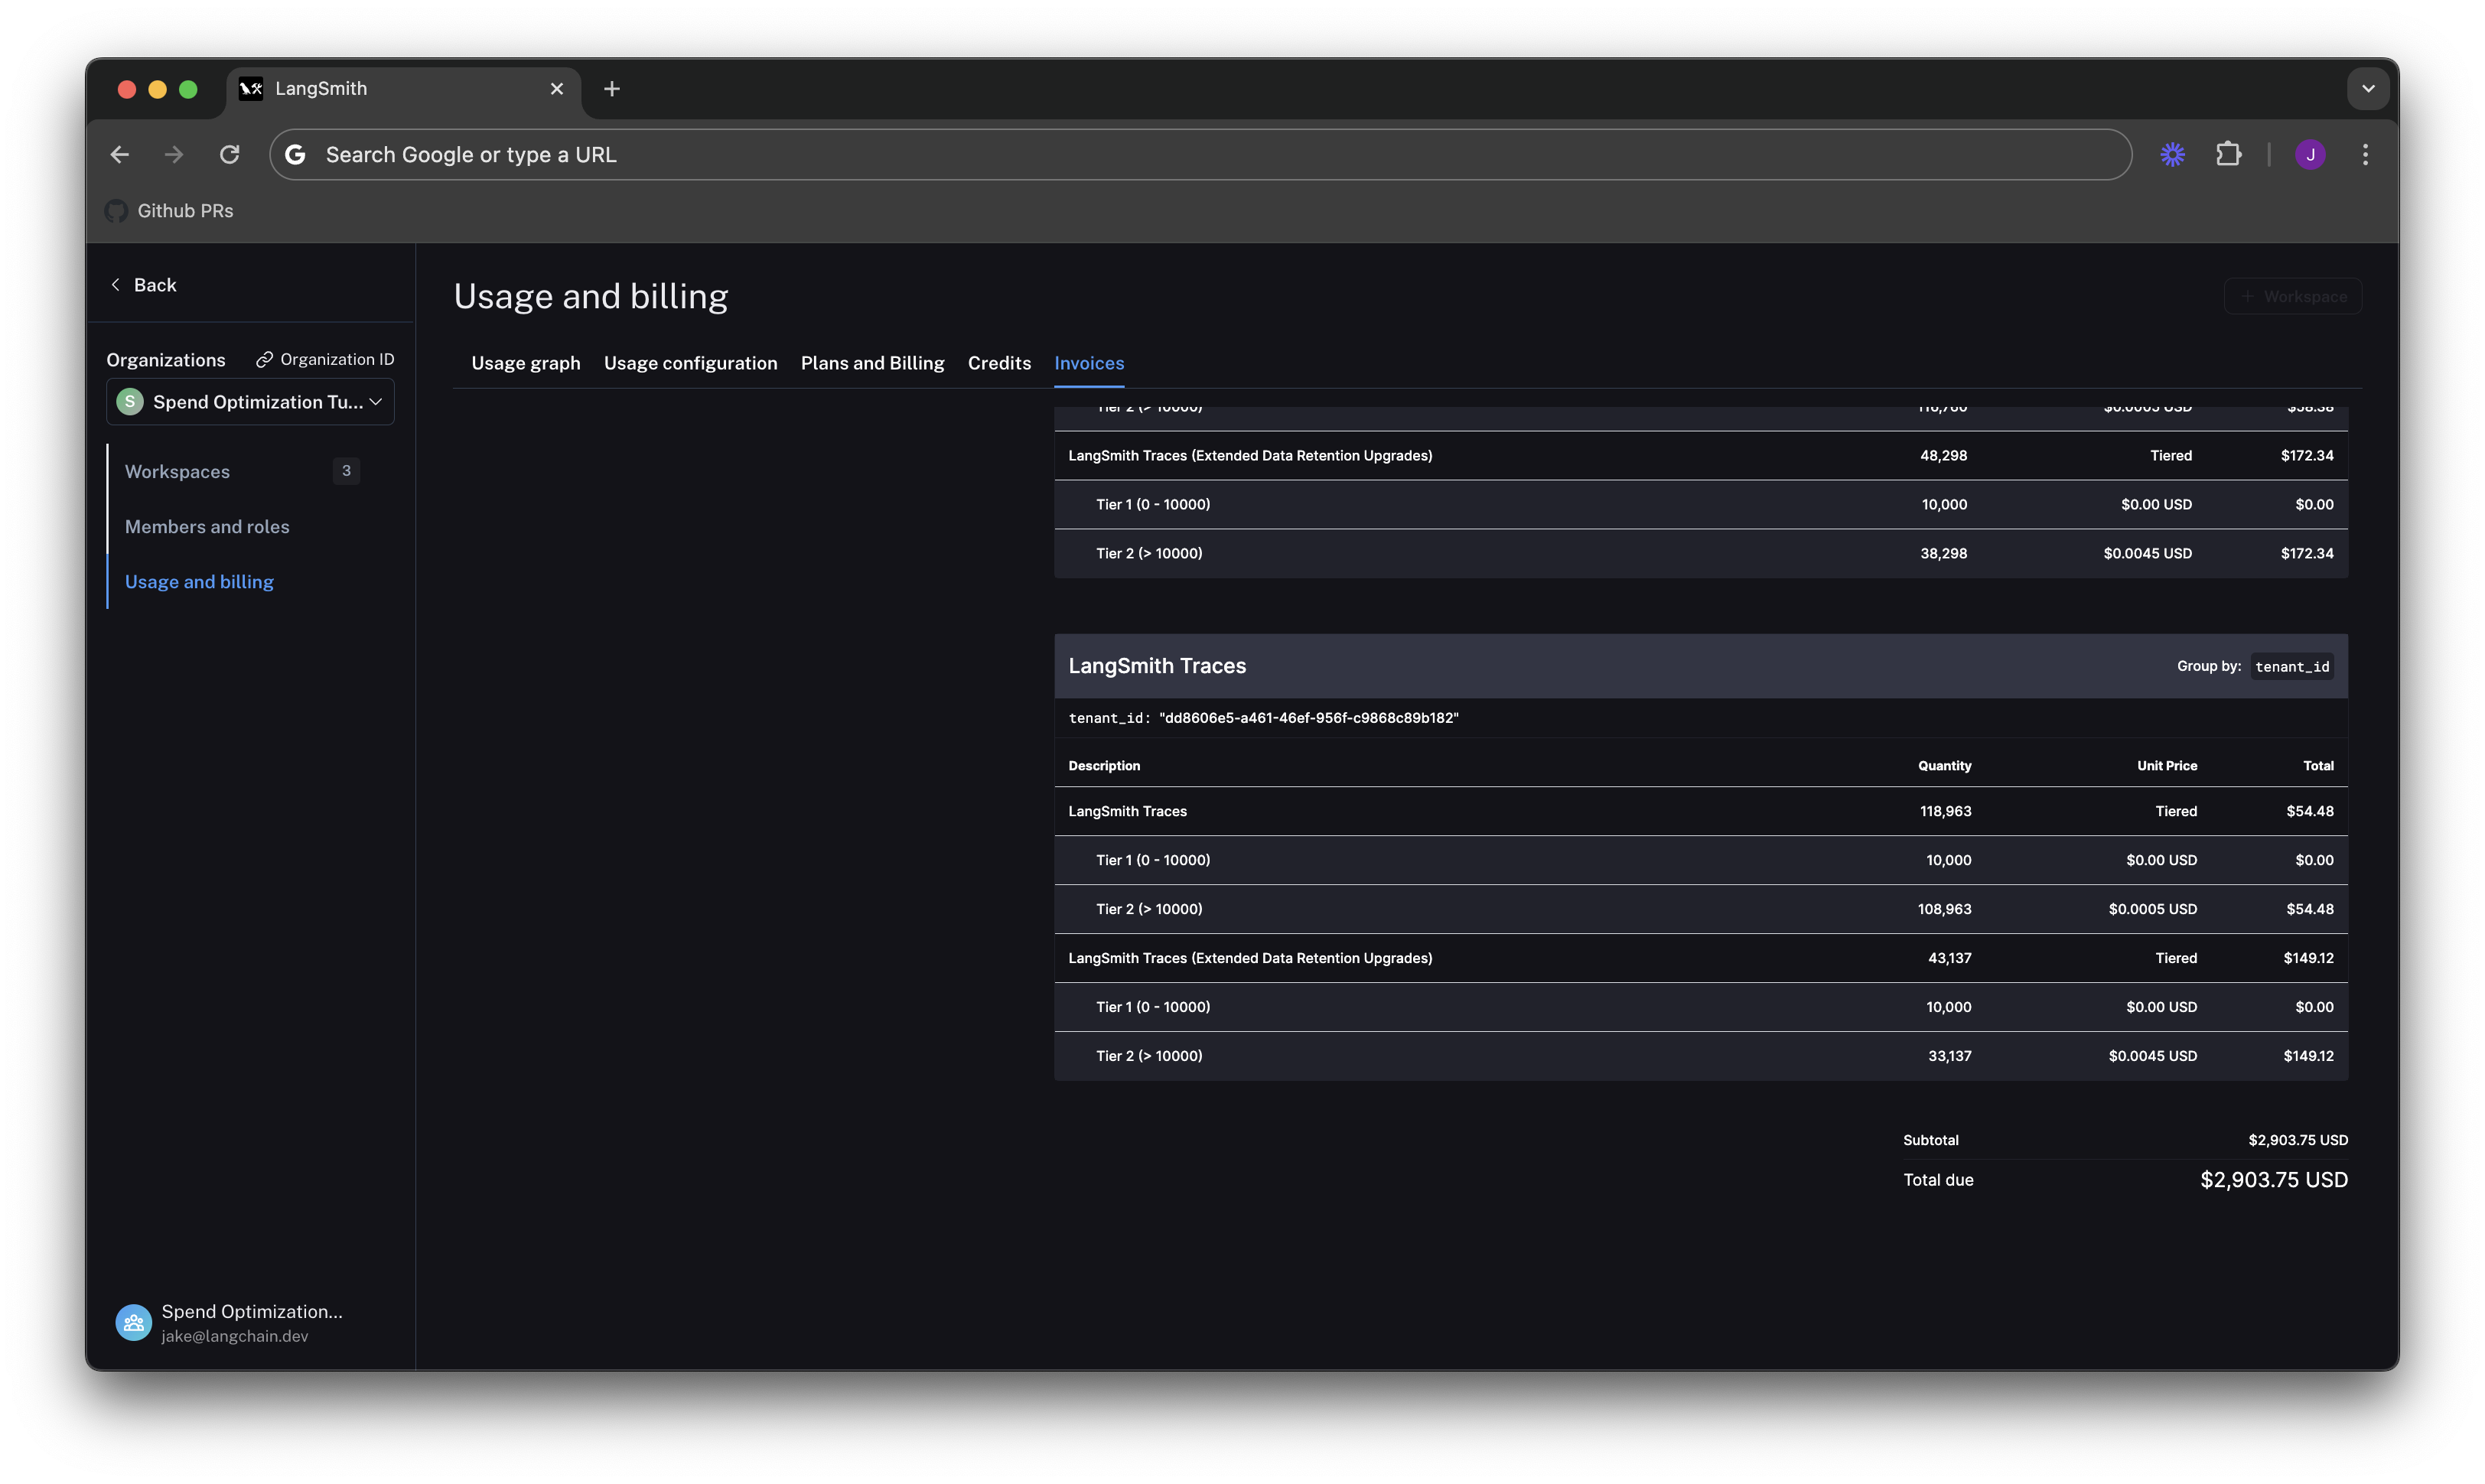
Optimization 2: limit usage
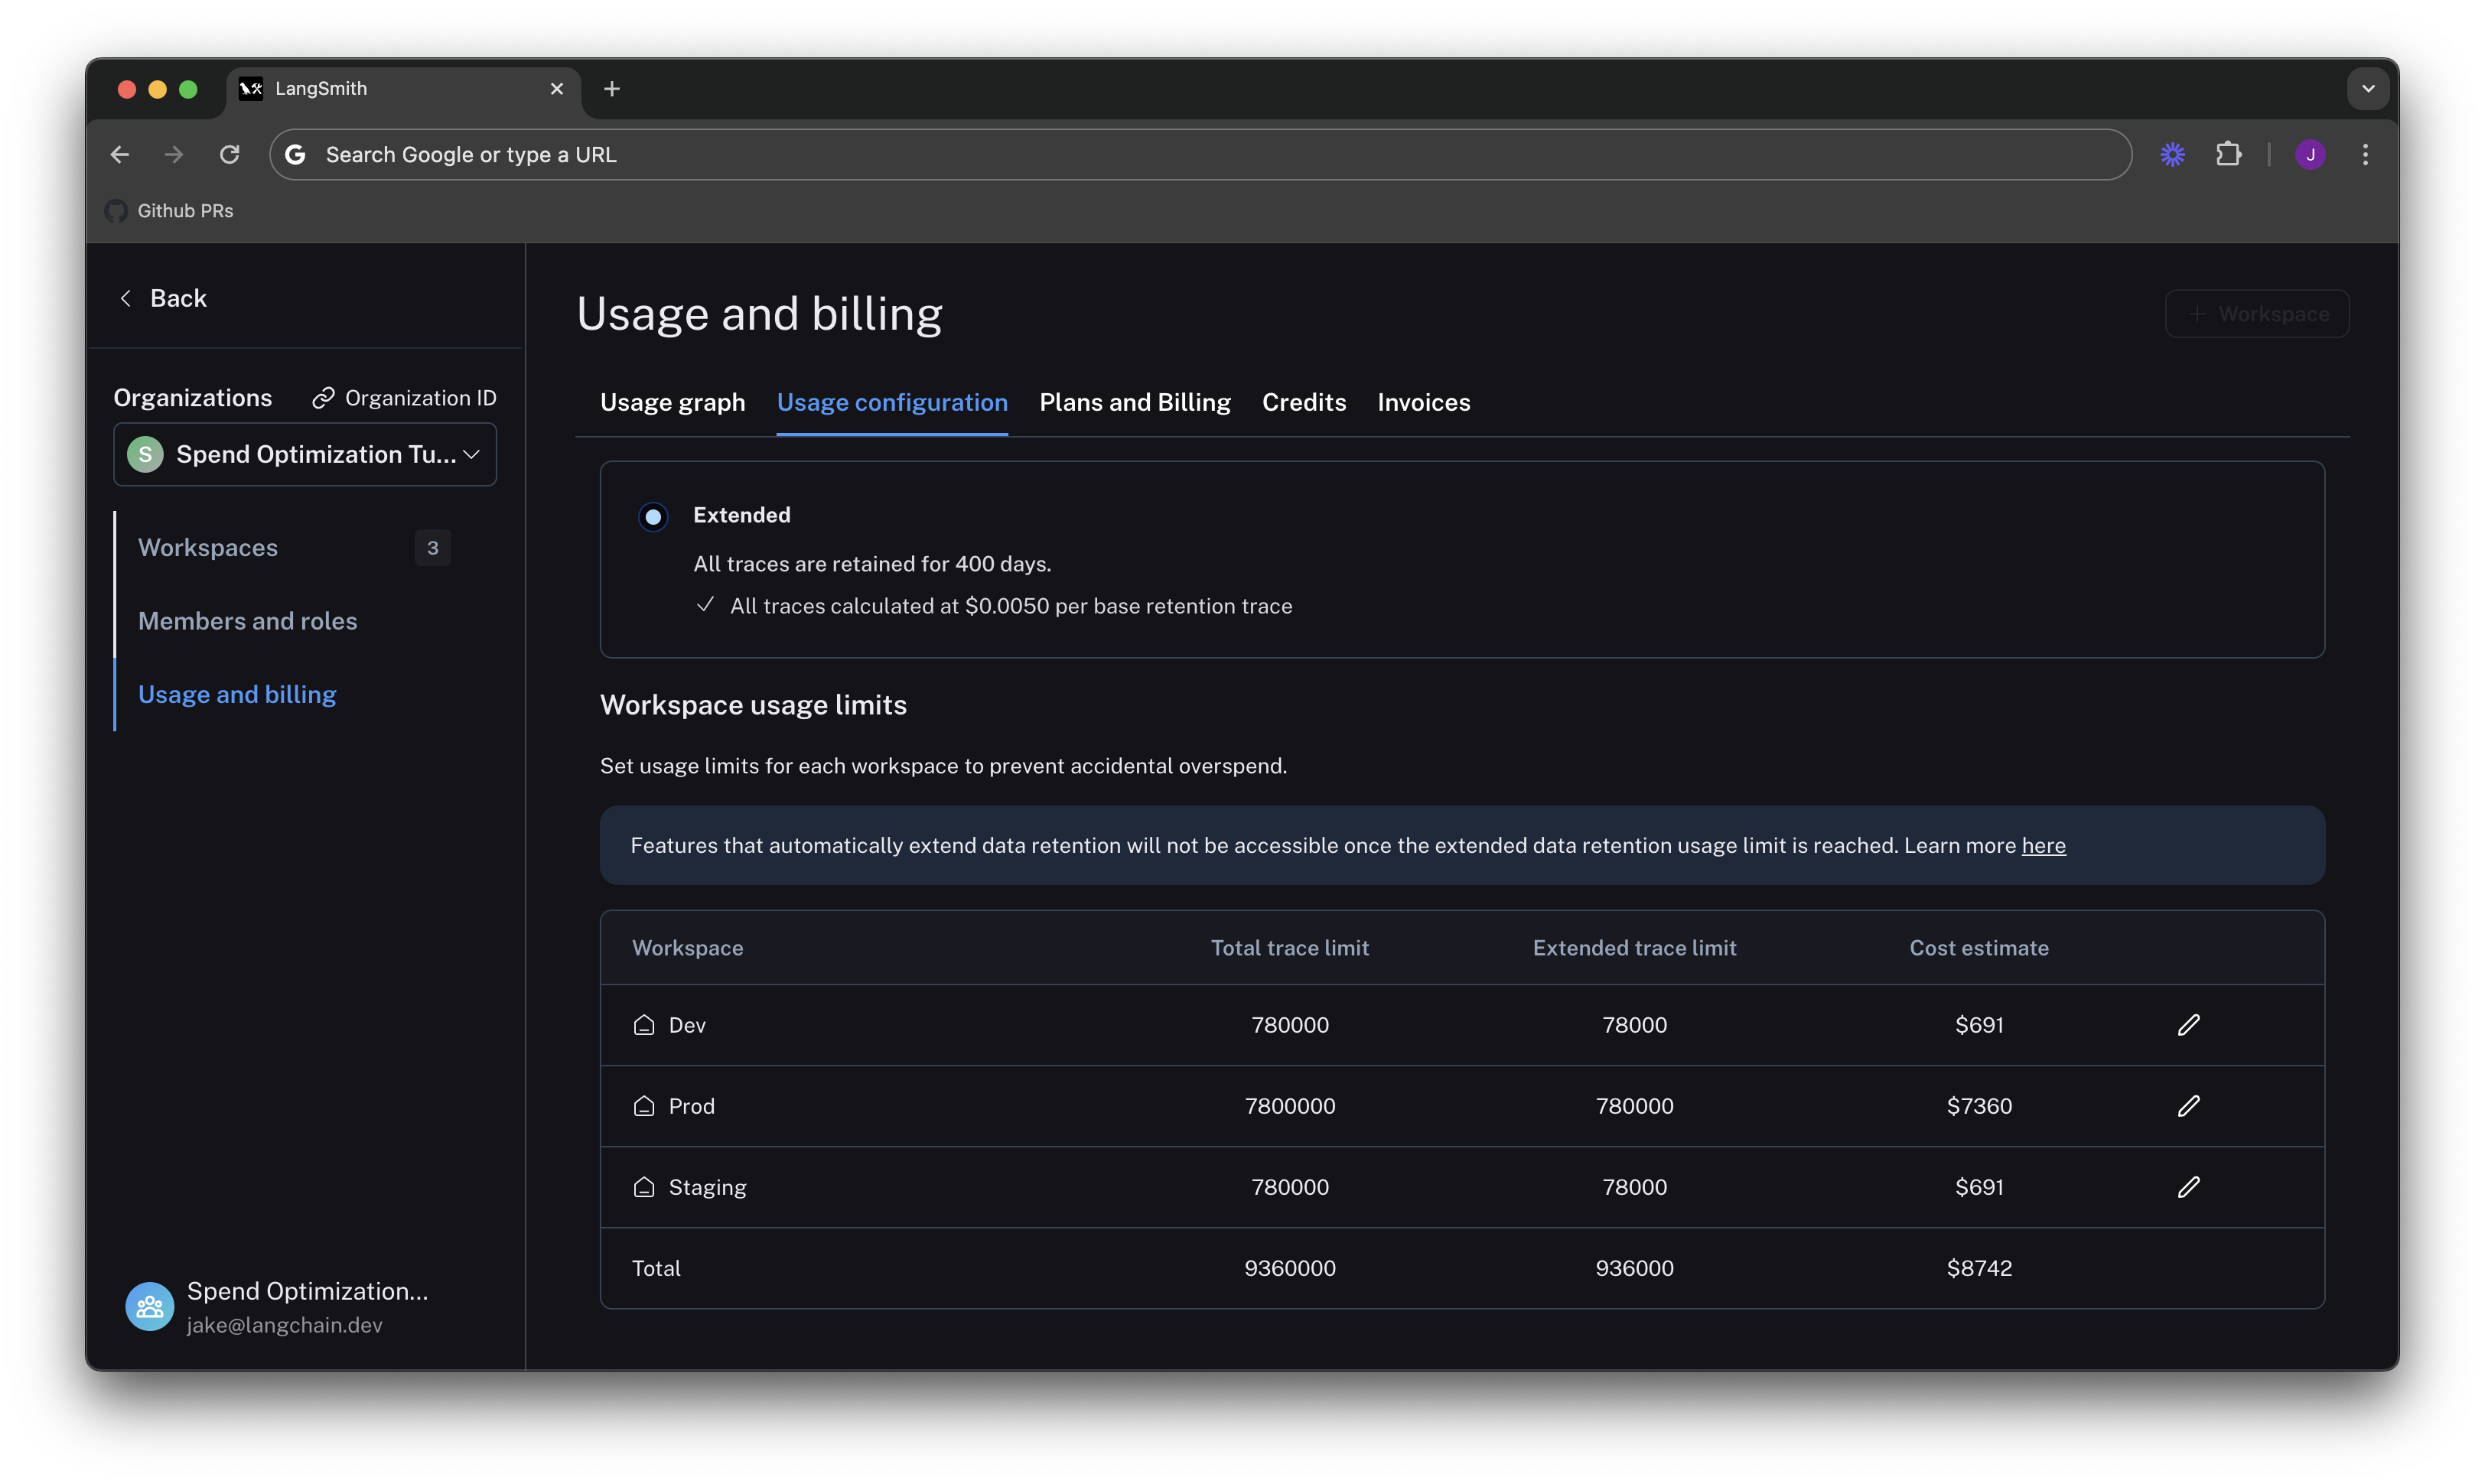
In the previous section, you managed data retention settings to optimize existing spend. In this section, you will use usage limits to prevent future overspend. LangSmith has two usage limits: total traces and extended retention traces. These correspond to the two metrics tracked on the usage graph. You can use these in tandem to have granular control over spend. To set limits, navigate back to Settings -> Usage and Billing -> Usage configuration. There is a table at the bottom of the page that lets you set usage limits per workspace. For each workspace, the two limits appear, along with a cost estimate:Set a good total traces limit
Picking the right total traces limit depends on the expected load of traces that you will send to LangSmith. It is important to consider potential growth before setting a limit. For example:- Current Load: The gen AI application is called between 1.2-1.5 times per second, and each API request has a trace associated with it, meaning it logs around 100,000-130,000 traces per day.
- Expected Growth in Load: The expectation is that this will double in size in the near future.
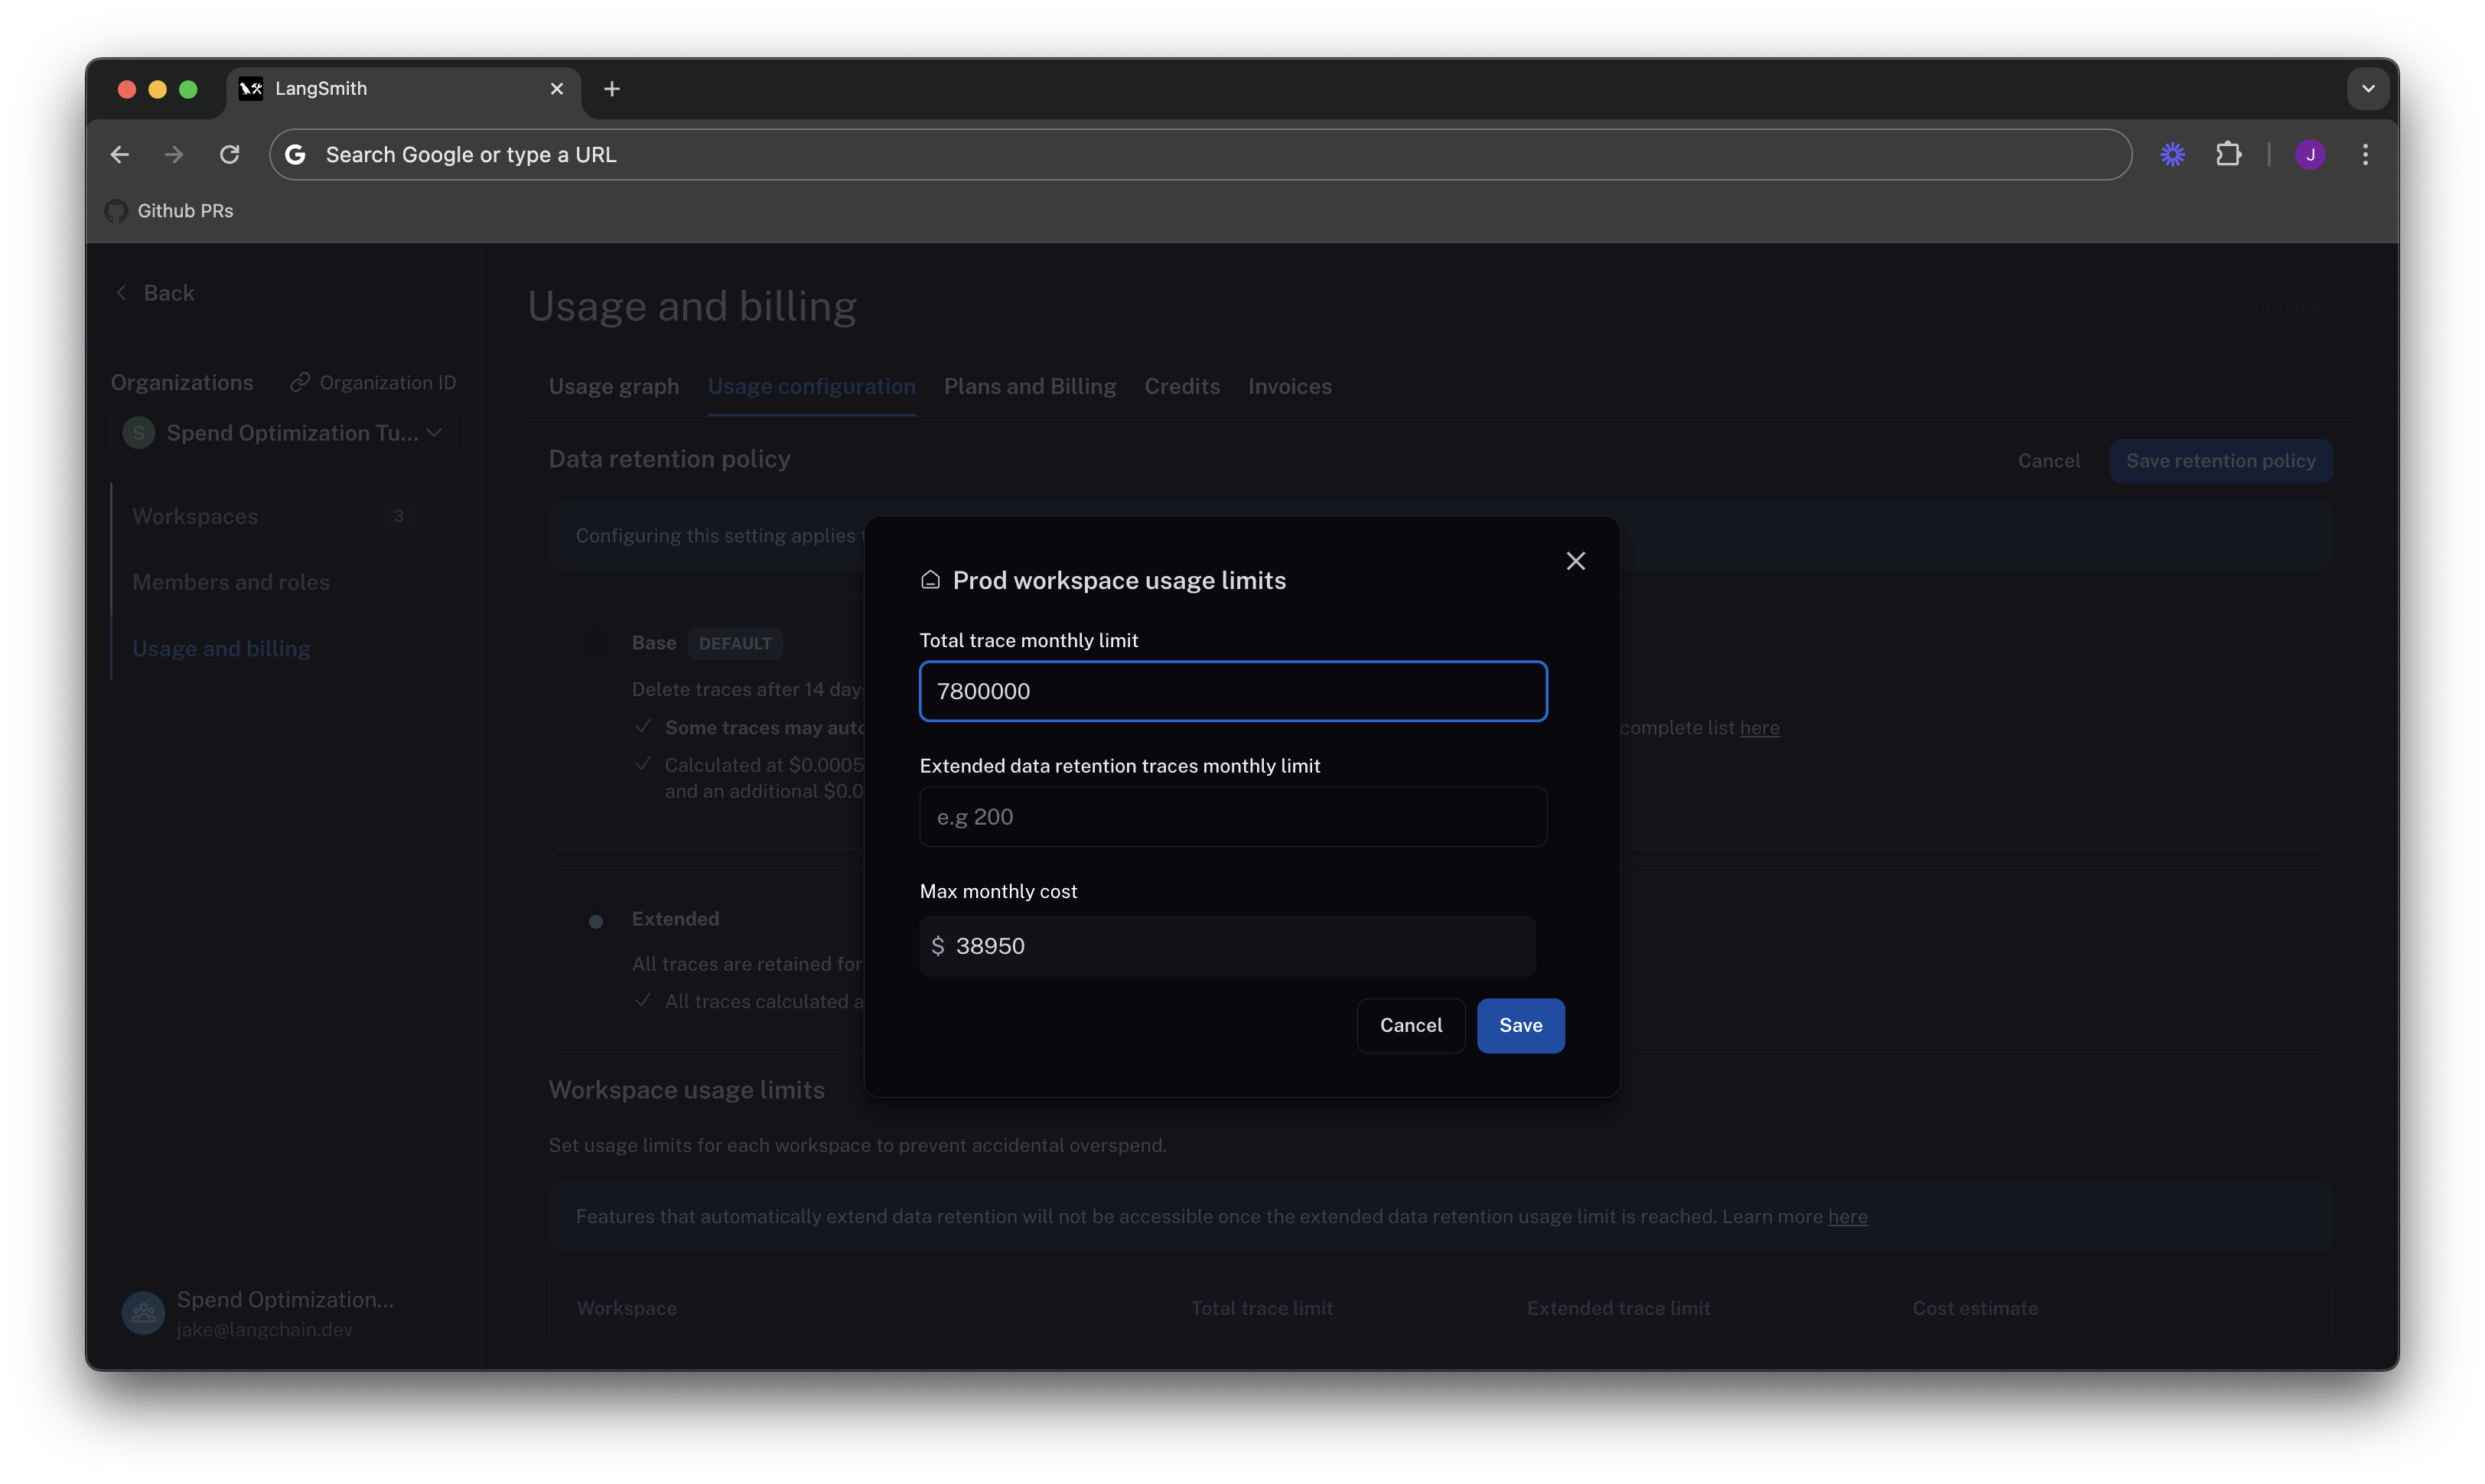
When set without the extended data retention traces limit, the maximum cost estimator assumes that all traces are using extended data retention.
Cut maximum spend with an extended data retention limit
From Optimization 1, you learned that the easiest way to cut cost was through managing data retention. The same is true for limits. If you only want to keep roughly 10% of traces to be around more than 14 days, you can set a limit on the maximum high retention traces you can keep. This would result in.10 * 7,800,000 = 780,000.
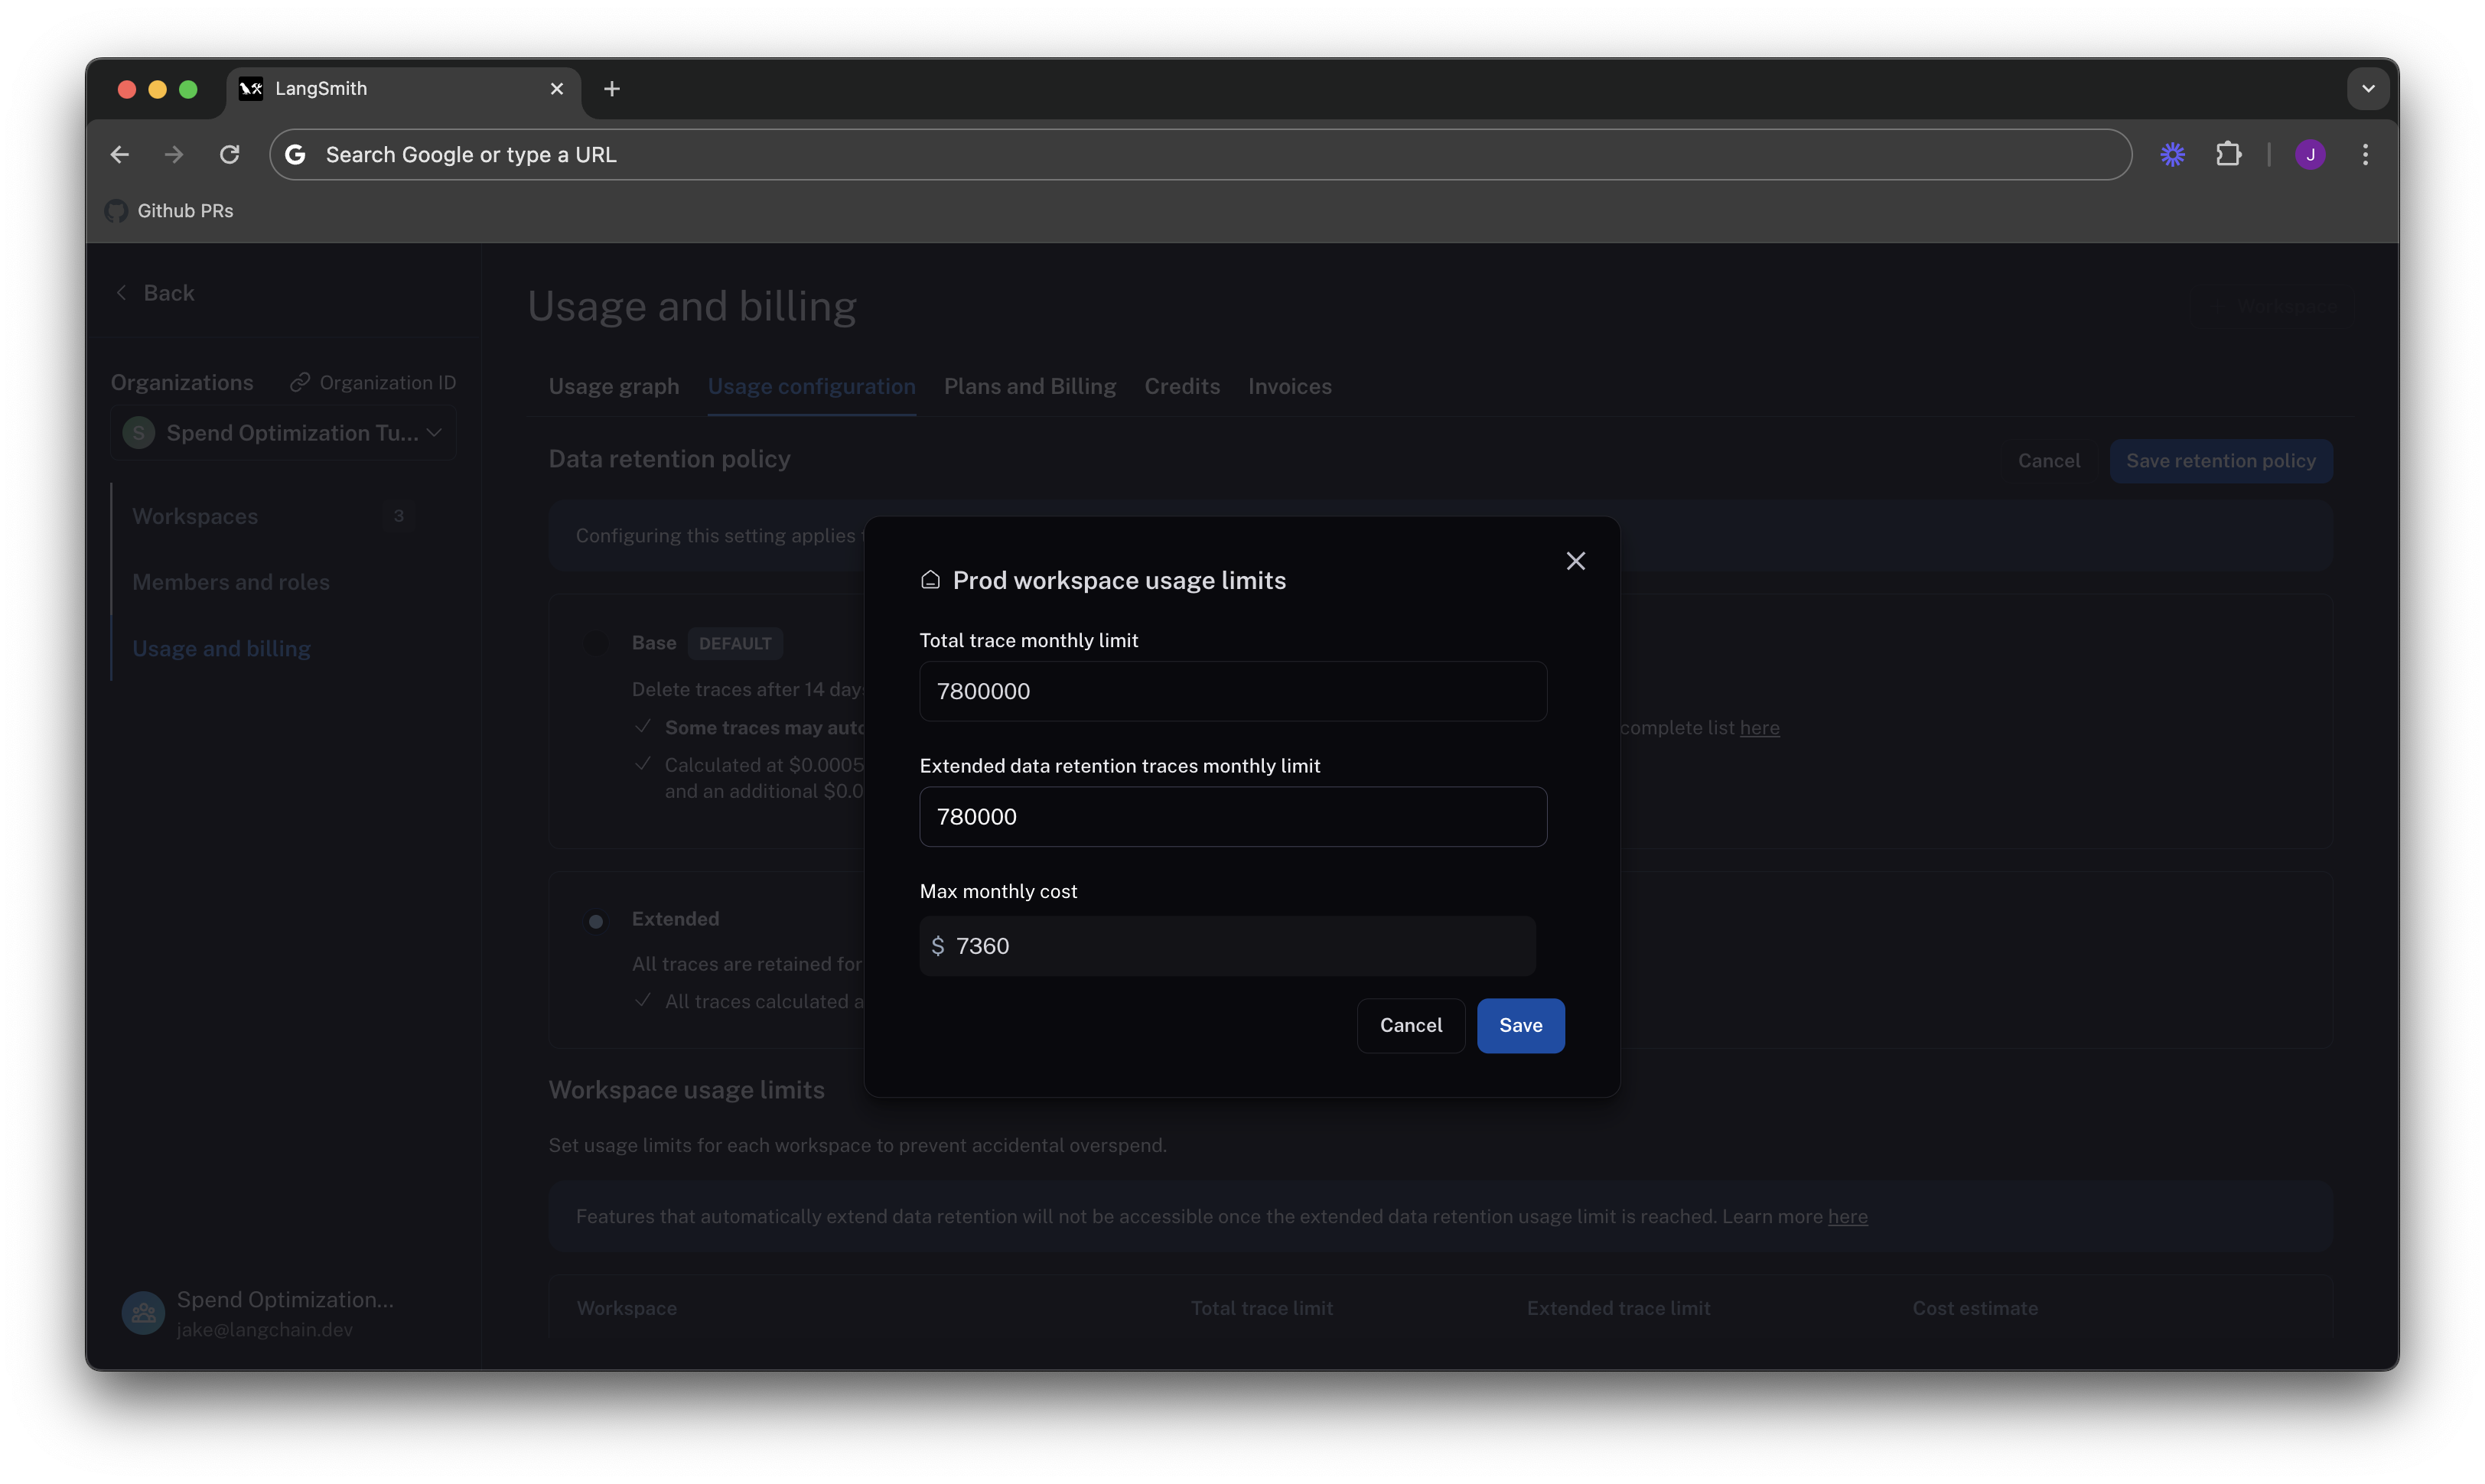
The extended data retention limit can cause features other than traces to stop working once reached. If you plan to use this feature, read more about its functionality and side effects.
Set dev/staging limits and view total spent limit across workspaces
Following a similar logic for thedev and staging environments, you can set limits at 10% of the production limit on usage for each workspace.
While this works with this usage pattern, setting good dev and staging limits may vary depending on your use case with LangSmith. For example, if you run evals as part of CI/CD in dev or staging, you may want to be more flexible with your usage limits to avoid test failures.
With the limits set, LangSmith shows a maximum spend estimate across all workspaces: